Kentucky Cream Pull Candy
Published: December 18, 2016 · Modified: February 13, 2024 by: Cindy Gibbs
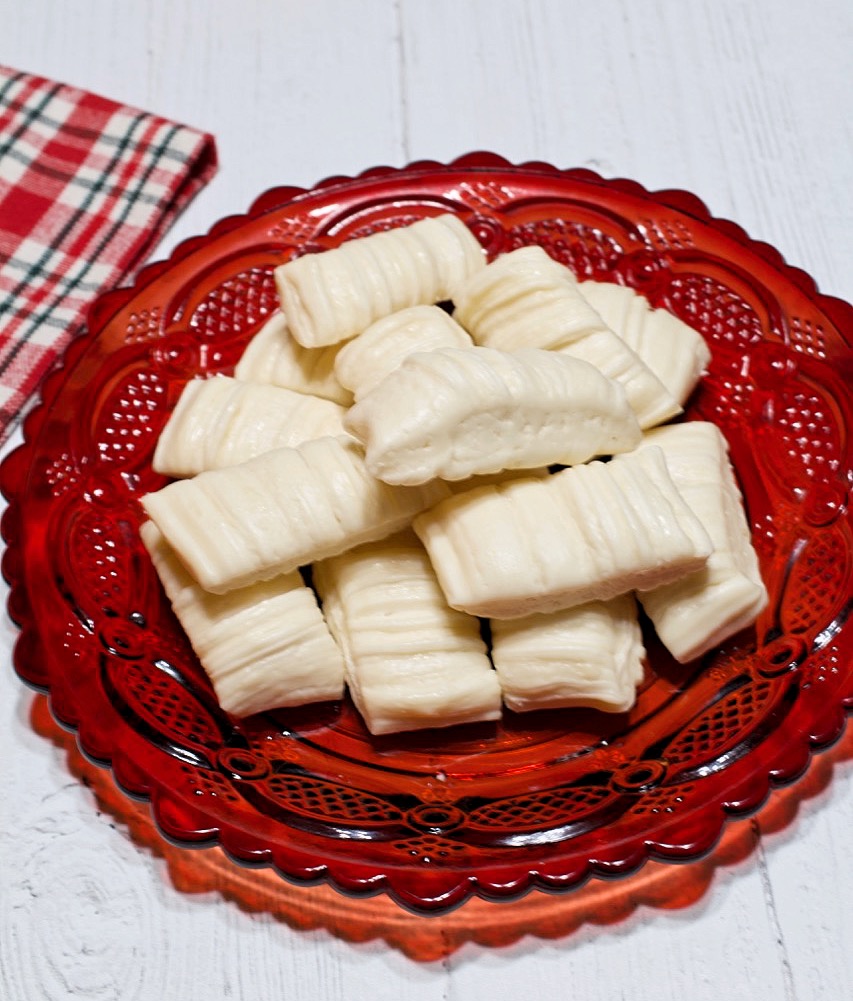
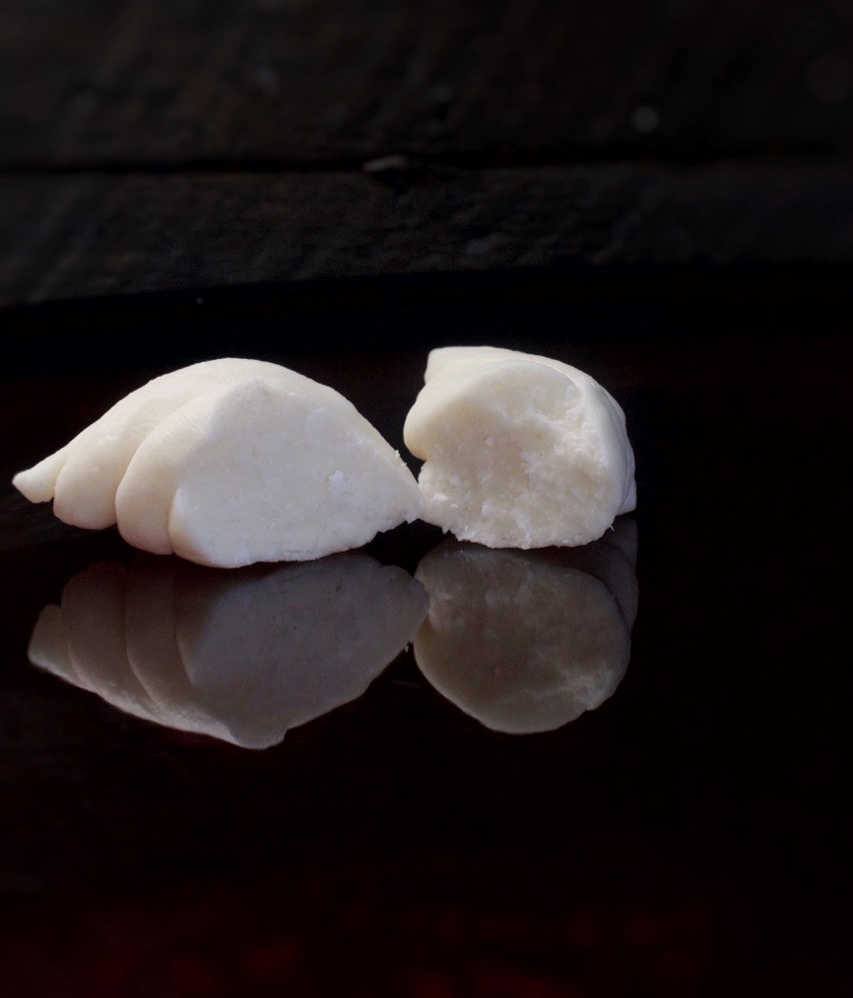
Kentucky Cream Pull Candy is an indulgence you will never forget!! This candy is made with pure whipping cream and sugar and it gets cooked, pulled, and cut into pieces of taffy-like candy. Then it gets covered and left to cream overnight. That’s when the miracle occurs. It miraculously turns into the most delicious melt-in-your-mouth candy that you will ever eat.
Due to the large amount of questions on this recipe, I’ve updated it with more tips and some updated, more specific pictures. This is an intermediate candy recipe. Don’t be discouraged if you flop it a few times…yes, a few times. Make sure to read through all the tips on this recipe and read the recipe thoroughly at least twice before attempting to make this candy. Once you make your first perfect batch you’ll be in heaven, and you’ll make batch after batch!
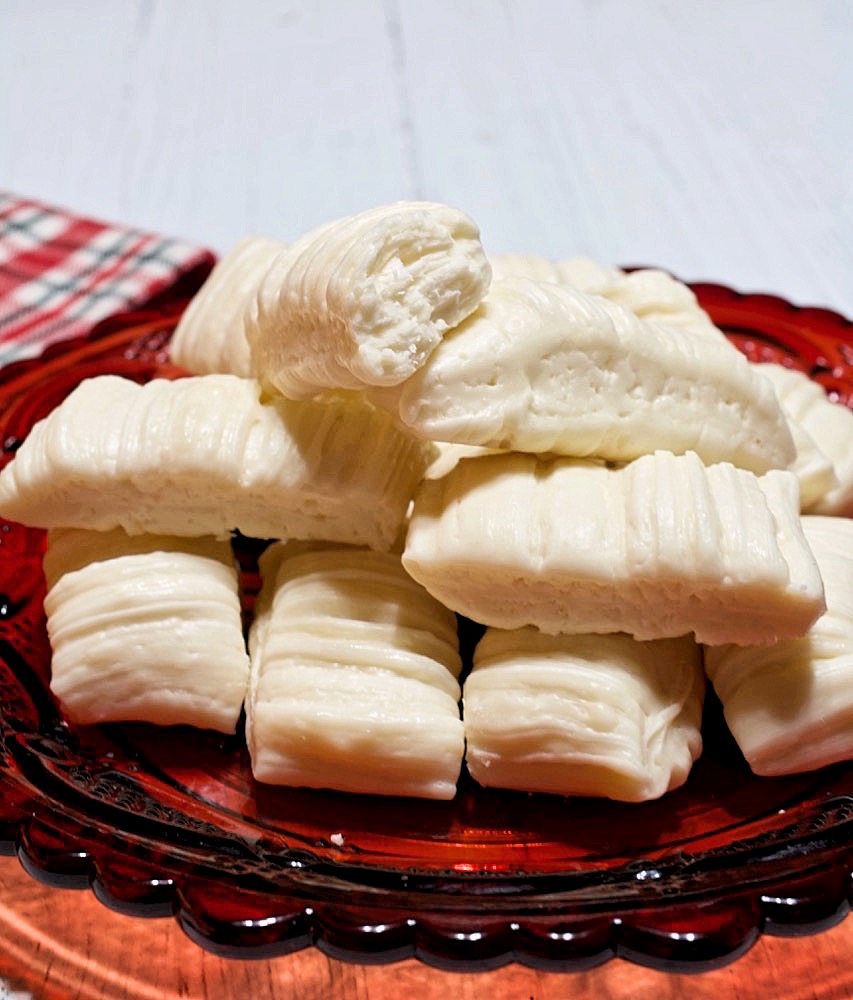
Okay my friends, as you know I’m from Kentucky, and I’m about to share with you my most favorite of all candy recipes and it originated right here in Kentucky. If you have never had a piece of Kentucky Cream Pull Candy, you truly don’t know what you’ve been missing, and if you have had this wonderful candy, you know exactly what I’m talking about. This creamy yet airy candy simply melts in your mouth. It’s made of sugar, pure vanilla, and heavy whipping cream…shall I say more!
I want to share this recipe with you for several reasons…
- It is an old-time recipe that goes back to at least the early 1900s or before. As I have mentioned on my home page, I want to revive the old recipes and not let them be forgotten, especially the great ones.
- I want to clarify the confusion that I see on Pinterest between Kentucky Cream Pull Candy and Vinegar Taffy. They look-alike but Vinegar Taffy is different. It’s Taffy and this recipe is Cream Candy. This candy has a consistency of Taffy when it’s first made but changes to a creamy melt in your mouth texture overnight.
- This is the most delicious candy you will ever put in your mouth. My friend Julie calls it “sinful”. I promise that if you have a chance to eat one piece of this melt in your mouth divine bite of heaven, you’ll want to know how to make it, and I want to make sure you know how to make it. When you eat a piece you will totally savor it as it slowly melts on your tongue and you’ll moan in great pleasure. You’ll keep going back for more until you make yourself sick. Trust me, I know!
The history of Kentucky Cream Pull Candy
No one knows exactly when the first batch of Kentucky Cream Pull Candy was made or who created the recipe. What we do know is that it appears to have originated somewhere in central Kentucky and it dates back to at least the early 1900s or before. There are four women in Kentucky who were all well-known for making this delicious confection…
Ruth Hanly Booe and Rebecca Gooch, two substitute school teachers in Louisville Kentucky, opened their own business in 1919, Rebecca Ruth Candies, in Frankfort Kentucky. Rebecca Gooch later sold her half of the business to Ruth Hanly Booe. I have a picture of Ruth Hanly Booe pulling the candy outside in her yard in 1923. Rebecca Ruth Candies is still well-known today for their candies here in Kentucky.
Ruth Hunt from Mt. Sterling Kentucky started making the candy from the basement of her home in 1921. She sold it by word of mouth until her business outgrew itself. She later found a permanent shop to sell her candy in 1930. She was also known for her creation of the Blue Monday, cream candy that had been dipped in chocolate. Today, you can visit and purchase Ruth Hunt candies in two locations, Mt. Sterling and Lexington.
Maxine (Mom) Blakeman from Lancaster Kentucky, started making the candy from her home in the 1940s. She made it available to the patrons at her restaurant. She started marketing her candy in 1961. Mom Blakeman’s Candy is still sold today here in Kentucky.
Kentucky Cream Pull Candy is cooked to a hard-ball stage, (260 degrees), poured onto a very cold marble slab, and when cooled enough to handle, is pulled like Taffy and stretched into a long piece of candy with ridges on the top and cut into pieces with scissors. It is left overnight to cream.
Many years ago candy makers thought the only way to get this candy to turn out perfect was to stand outside in freezing cold temperatures to pull it. Many years later, we now know that this is not necessary. Years ago and today, most people think that you cannot make this candy when it is raining or humid outside. Well, I’m here to disagree with this common belief among some candy makers. I have turned out my very best batches of this candy on rainy and humid days.
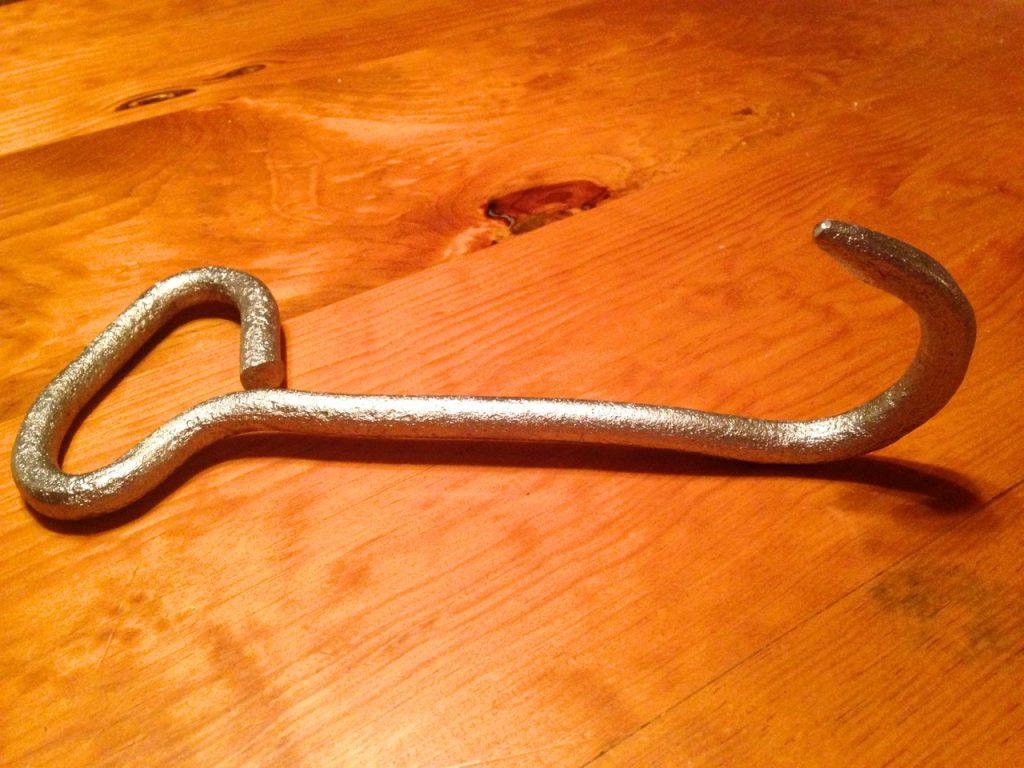
Some people enlist the help of a second person to help them pull this candy. Others use a large hook to pull it, especially if they are making several batches of it. The candy gets placed over the hook and gravity pulls it down.
TIPS
- If you’re using a candy thermometer to test your candy, make sure it’s calibrated correctly. I calibrate my candy thermometers once a year just before the holidays when I know I’m going to be making a lot of candy. It takes just a few minutes to calibrate your candy thermometers, so save yourself a flopped batch of candy by doing this step. Click here to see how to calibrate your candy thermometers.
- Use the right pot for candy making! Use a heavy-bottomed pot and one that is deep enough. Most candy bubbles and rises up in the pot before it cooks back down. Make sure your pot is tall enough so the candy doesn’t bubble over.
PREPPING TO MAKE KENTUCKY CREAM PULL CANDY
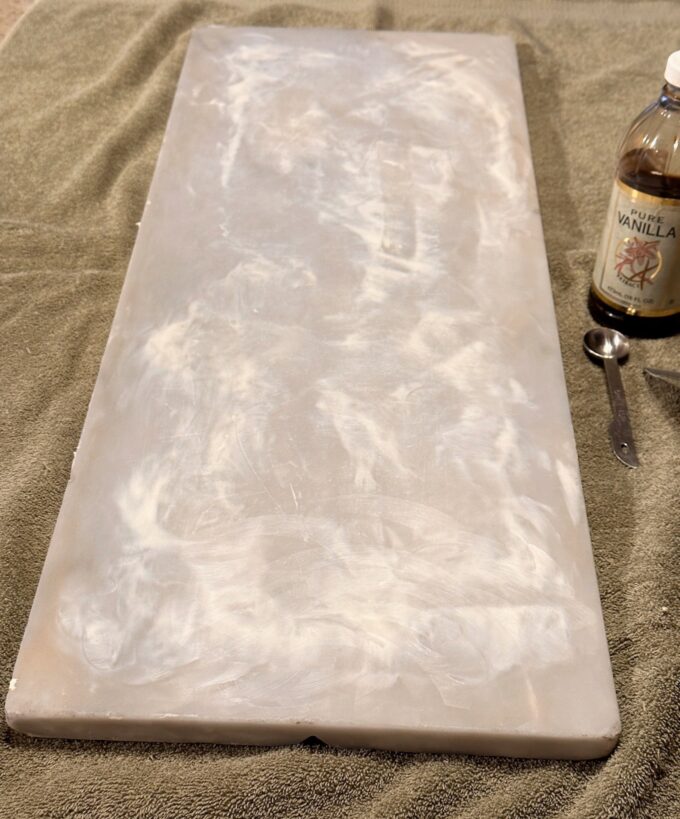
- Start by prepping your marble slab. Marble is heavy. Make sure to place it on an old towel on your work surface if it’s not perfectly smooth on the bottom. Make sure it is VERY cold, as “in the freezer” cold. If it’s winter you can place it outside. Placing it in a refrigerator does not get it cold enough.
- Rub some butter over it before placing it outside or in the freezer. If you wait until it’s cold, it will be hard to spread the butter over it, although you can. I do when I forget to butter mine ahead of time.
- Have your bottle of vanilla near by. You’ll need it as soon as you pour the hot candy onto the cold slab.
- Place a pair of sharp kitchen scissors in your freezer.
COOKING THE CANDY
Start by adding 4 cups of sugar, a pinch of salt, and 1 cup of boiling water to a deep pot. Bring the mixture to a boil over high heat. Cover with a lid and boil for exactly 5 minutes. Why this step? By boiling the sugar water for 5 minutes covered, it causes the sugar to dissolve, and also keeps sugar crystals from forming on the insides of the pot.
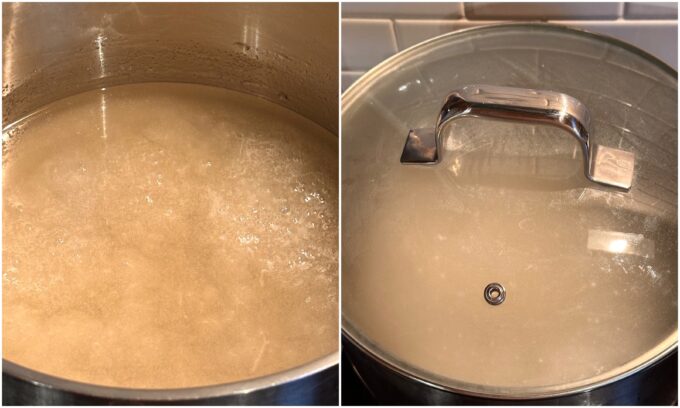
Remove the lid, reduce the heat to medium, and add a candy thermometer to the side of the pot, or use a digital instant read thermometer. Slowly add 1 cup of heavy whipping cream, making sure the mixture doesn’t stop bubbling.
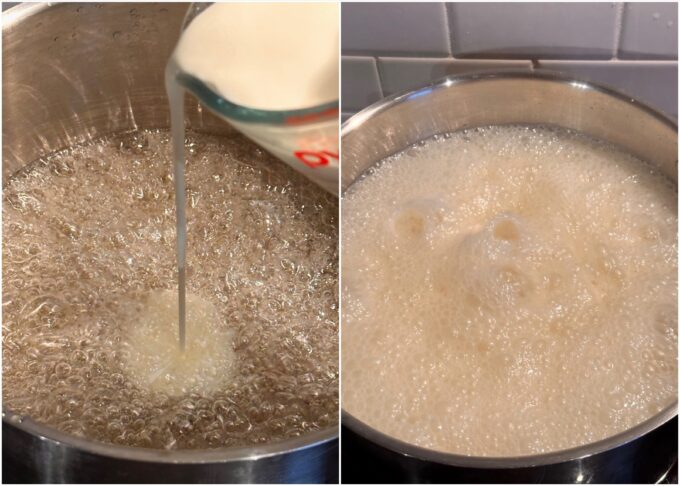
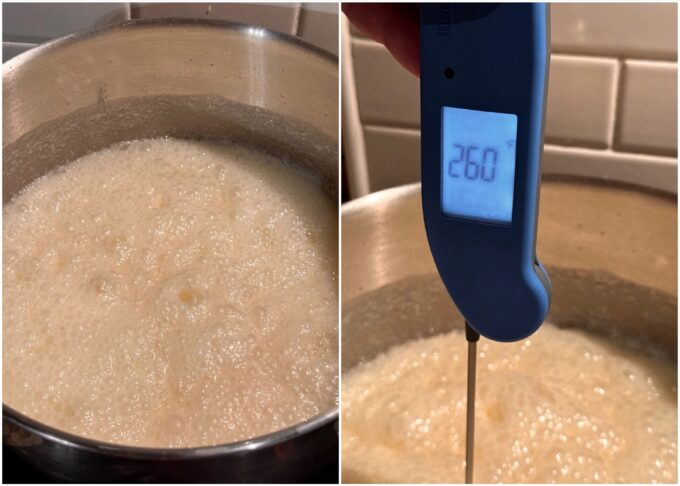
The mixture will bubble up quite high for a few seconds before it settles back down. That’s why it’s important to not use a short pot. Continue to cook the mixture over medium heat, without stirring, until the mixture reaches 260 degrees, (a hard-ball) on the candy thermometer, or when tested in cold water. Click here to see how to test candy in cold water. Immediately remove the pot from the heat.
In case your candy thermometer is not calibrated correctly, (and many are not), the color of the candy should never be any darker than what you see in the pictures below, a cream color. If your candy is brown in color, it’s over cooked.
Next, pour the hot candy onto the cold buttered slab. Drizzle the vanilla over the top. After about 30 seconds, use a thin metal spatula and slide it under the edge of the candy, folding it into the center as you slide the spatula along under the edge. Do this on each side.
As the underside starts to cool, flip it over one time to cool the top side, and keep moving the candy to the coldest area on the marble slab to help it cool down enough to handle.
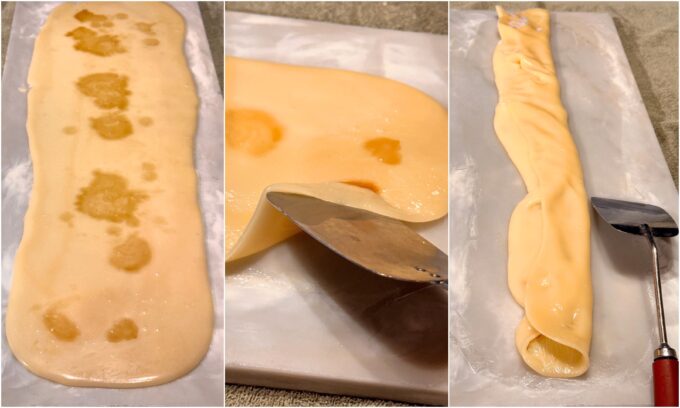
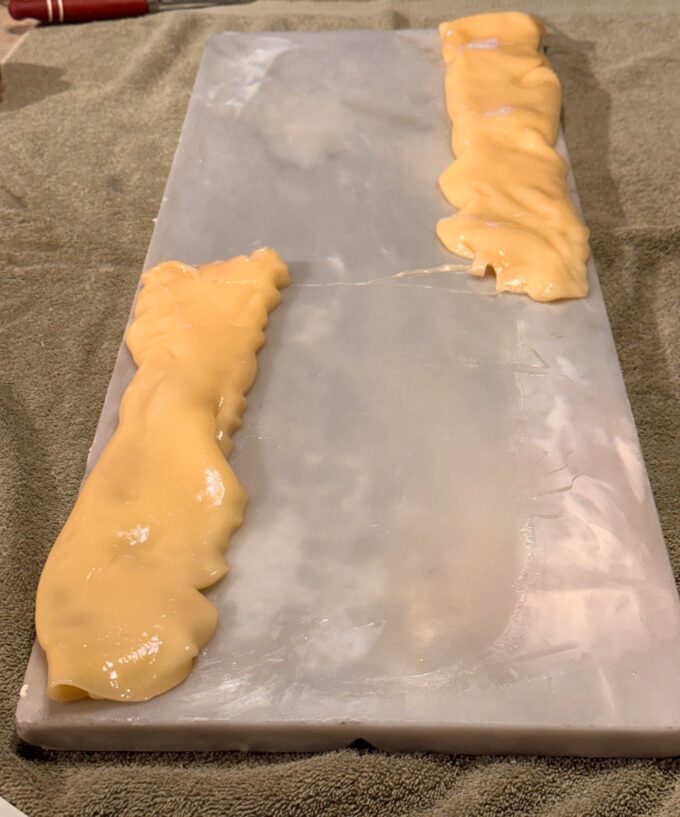
At this point, if two people are pulling the candy use the edge of the metal spatula and cut the candy in half. Note in the picture below, we cut the candy in half, then moved it to the edge where the slab was cooler.
Read these tips before pulling the candy
- Use your finger tips to pull the candy. Many people have hot hands. My husband is one of those people. The palms of his hands are always very warm. The more he pulls the candy, the more it sticks to this hands. The more it sticks, the more he feels the need to butter his hands. Don’t do this. Using your finger tips, hold the candy either horizontally or vertical and pull it out about 2 feet in length. If holding it vertically in the air, gravity will help you easily pull the candy downward.
- Use butter sparingly. You might think adding more butter to your hands helps, but it really doesn’t. It might help for a few seconds, but then you realize you need more. The addition of butter ends up making the candy more sticky. Then you keep adding more butter because the candy is sticking to your hands even more. Make sense? At this point, my husband would be yelling HELP! He finally got it after he ruined 1/2 batch of candy a few times.
- Use ice water. Place a small bowl of ice water next to your marble slab and a small towel. Dip your fingers in the ice water and dry them off before you start to pull the candy. If the candy starts to stick to your fingers at any point, stop and quickly dip them in the ice water again.
PULLing THE CANDY
You should pull this candy for approximately 4 to 5 minutes. I have included photos below showing what it should look like when it’s ready to be pulled out into a rope and cut into pieces.
Pull the candy out pretty far in length. I pull it out to at least 18 inches, then I fold it over in half and pull it again. I don’t pull it ultra fast but I don’t move like a snail either. I hate to keep picking on my husband, but sometimes he pulls his very slow. If you pull it too slow, it will start to become grainy, and can start to turn into a clump in your hands. Also, don’t simply pull it to about 12 inches and stop. There’s a purpose behind pulling the candy and pulling it long enough and moderately fast enough.
Below are a couple of pictures taken about 1 minute before pulling it into a rope and laying it down. See the shine and texture. It’s no longer sticky and has lost most of its shine. It has a satiny sheen appearance and the candy has become lighter in color. At this point it’s almost ready. I pulled it 2 more times before pulling it into a long rope and putting it down on the marble slab.
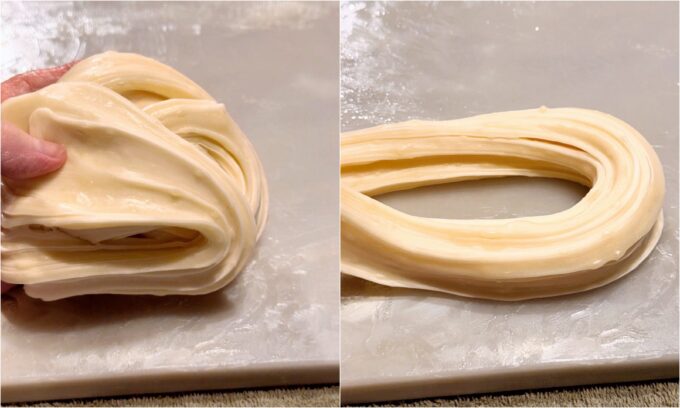
Okay, so once it becomes satiny and lighter in color, it’s ready to put down. If pulled correctly, the candy will have ridges along the top of the candy. Pull the candy out into a long rope and lay it down on the slab. Some people like their candy to be as much as 3 to 4 inches wide. I like mine about 1 1/5 to 2 inches wide, (perfect bite size).
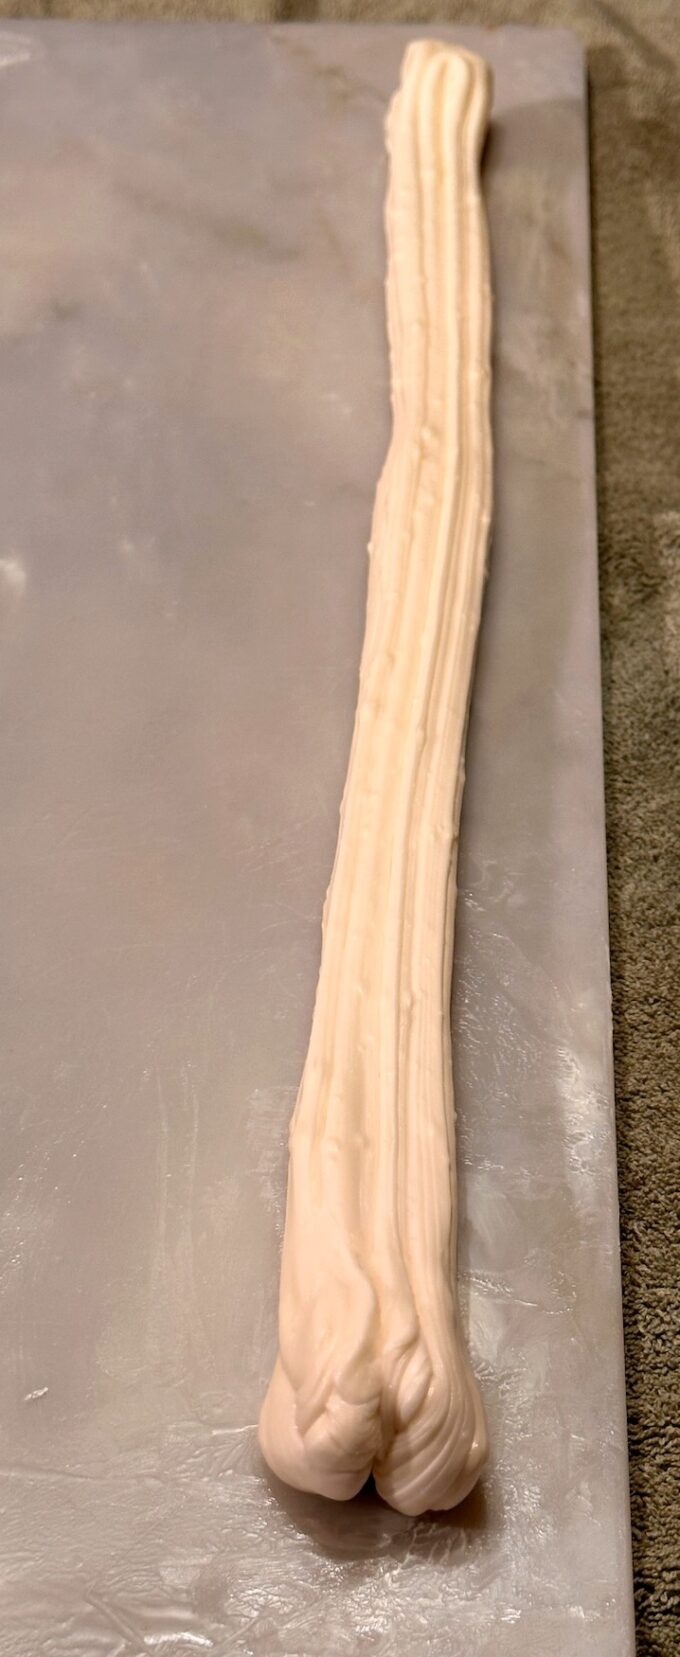
As soon as you lay it down, take your scissors from the freezer and start cutting the candy into bite size pieces.
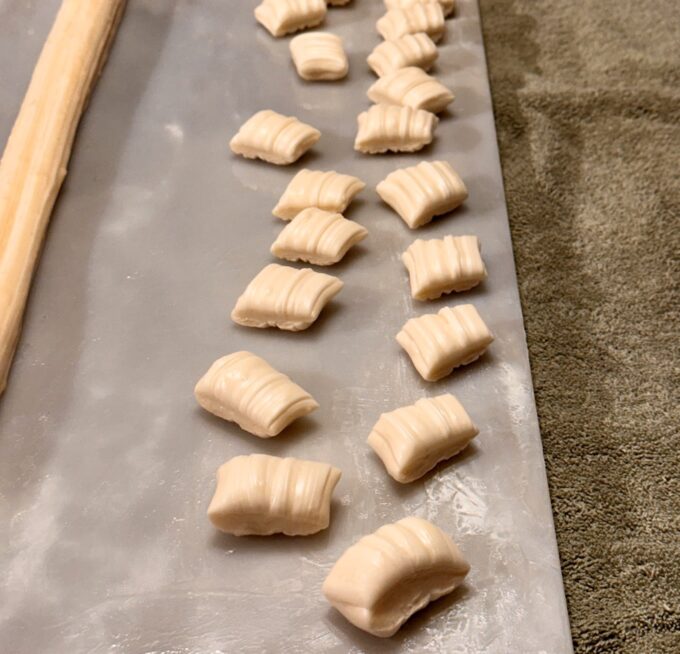
At this point, the candy will be slightly sticky and rather dense in texture. It is the most delicious tasting Taffy at this stage. You will want to eat the entire batch just as it is, but you must make yourself leave it alone until it creams. You’ll thank me later.
Quick tip: You can wrap the taffy-like pieces individually in plastic wrap and freeze them as soon as you cut them. Then you can grab one from the freezer when you want a piece of delicious tasting taffy. Some of my family prefers them frozen.
Transfer the candy pieces to a cookie sheet, and cover the candy with a lint free towel overnight. You can also put it in a tin, but you must make sure that the pieces are not touching together while they are still slightly sticky. Often times, this candy will cream within a couple of hours as well. As soon as the candy creams, transfer it to a candy tin.
FAQ’s
Why did my candy turn into a clump in my hands?
- If the candy is over cooked.
- If the candy is left on the marble slab too long before pulling, such as the slab not being cold enough, and the candy being too hot for too long before being able to handle.
- If the candy is pulled too slow. You don’t have to feel like you’re in a race when pulling this candy, but by no means don’t poke around at a snails pace either.
- If the candy is pulled for too long. You need to pull the candy long enough for it to look satiny and lose its shine. It should also hold its ridges when you pull it into a rope. However, as soon as it holds its ridges stop pulling. If you keep pulling past this point it will turn to sugar in your hands.
- Stopping frequently to butter your hands. Each time you stop the pulling process, the candy will start to try and cream a little.
Why didn’t my candy set up? Mine stayed sticky and stringy and wouldn’t hold its ridges. Why?
When this happens the candy has usually been under cooked. Check your candy thermometer to make sure it’s accurate. It might need to be calibrated. The candy should turn from a whitish color to a cream color when it’s ready to come off the heat. If you keep trying to add butter to your hands to fix this problem, you’ll end up with both sticky and stringy candy.
Why is my cooked candy brown?
It’s been over cooked. It should never be brown. It should be a light cream color when it’s finished cooking. It should lighten up a little more once pulled.
My candy stayed in a taffy stage and did not cream but became hard. Why?
- The candy has been under cooked (or)
- The candy wasn’t pulled long enough.
I pulled the candy long enough, but when I left it to cream overnight it turned sugary on the outside. Why?
- It might have been pulled too long.
- Or could’ve been slightly over cooked.
Why did my candy burn on the bottom?
The only reason it would burn is if you forget to turn the heat down to medium before adding the cream. The cream should also be added slowly. You should not have to stir it.
Chocolate dipped candy
You might be familiar with the Blue Monday version of this candy made by Ruth Hunt. If you like their chocolate dipped version, you can melt some chocolate and dip the tops or the bottoms in chocolate. I recommend using dark bittersweet chocolate to offset the very sweet candy. However, feel free to use your favorite.
Some people make this candy in different flavors. I have never experimented with different flavors. This candy is so delicious in its original flavor, I don’t dare change it.
If you like candy recipes, check out my collection of candy recipes!
Check out my recipe posted in Southern Living Magazine!
If you make this recipe please rate it, and leave a comment below on how you liked it. I love hearing from you!
Wanna see different recipes each day? Feel free to follow me on Facebook, Pinterest, & Instagram.
Print
Kentucky Cream Pull Candy
- Prep Time: 10
- Cook Time: 20
- Total Time: 30
Description
Kentucky Cream Pull Candy is an indulgence you will never forget!! This candy is made with pure whipping cream and sugar and it gets cooked, pulled, and cut into pieces of taffy-like candy. Then it gets covered and left to cream overnight. That’s when the miracle occurs. It miraculously turns into the most delicious melt-in-your-mouth candy that you will ever eat.
Ingredients
- 4 cups granulated sugar
- Pinch of salt
- 1 cup boiling water
- 1 cup heavy Whipping Cream
- 1 teaspoon Pure Vanilla
- Butter for marble slab
Instructions
- Combine sugar, salt and boiling water in a large pan. Bring to a boil over high heat. Cover the pan with a lid and let mixture cook for exactly 5 minutes.
- Remove lid and reduce heat to medium. Add a candy thermometer to the side of the pan. Slowly add the cream, a little bit at a time, making sure that the mixture does not stop bubbling. DO NOT stir. Cook until candy reaches 260 degrees on a candy thermometer or forms a hard ball when tested in cold water
- Remove candy from heat, and immediately pour onto a very cold buttered marble slab. DO NOT scrape the insides of the pan. Drizzle the vanilla over the surface of the candy. Using a metal spatula, turn each long side of the candy inward. Flip the candy over to cool the top side.
- When cool enough to handle, cut the candy in half, (if two people are pulling it). Using your fingertips, pull the candy for at least 3-4 minutes until it’s no longer shiny and sticky and has started to look satiny and lighter in color. It should also hold its ridges when pulled. Pull the candy into long ropes and place it on the marble slab. Using scissors, immediately cut the candy into pieces about 1 1/2″ long. Make sure the candy pieces are not touching since they are still sticky at this point. The candy will now be a consistency of taffy. It’s delicious but try not to eat it.
- Cover the candy with a towel and let it set overnight to cream. Candy can be placed in a tin, but pieces should not be touching until the candy has creamed. I find it best to just spread the candy on cookie sheets or leave on the marble slab and cover with a non-frizzy towel.
- Yields: About 2 pounds
Notes
- If you’ve never made this candy, take a moment to look at the illustrated steps above this recipe, before attempting to make it. It’s really not hard…it just takes a few minutes and a little patience, but it is so worth it.
- Time does not include pulling and cutting candy.

Hello! After having homemade pull candy when visiting Hindman, KY, I was so excited to make it myself! I don’t have a marble slab, but did the cookie-sheet-in-the-freezer workaround. All went well till I was using my bench scraper to pull the edges into the middle…in just a moment, the whole batch turned to sugar. I’m not giving up, but would love your ideas on what went wrong. I think 1) the cookie sheets didn’t hold the chill long enough (they were hot as soon as I poured the candy in), and 2) I didn’t wait long enough before pulling in the edges. What do you think? I’ve seen other recipes using a tiny bit of vinegar, which I believe inhibits crystallization a little bit. I may try something like that.
I took a photo, but can’t see a place to attach that to my comment.
Hi Sarah,
I think I can help here, and you are right about the cookie sheets. You need to try to find a piece of marble slab if you can. Try looking at a store that sells marble and granite countertops for a scrap piece. Even my marble slab gets warm rather quickly. I have a piece that’s about 12-inches wide and almost 3′ long. It fits perfectly in the top of my big freezer when I make candy in the summer and in the winter I place it out on my deck. You want the candy to cool quickly so you can handle it right away. If you don’t start pulling it within about a minute it will turn to sugar. Also, when I’ve allowed my husband to help me, his sometimes turns to sugar. He has hot hands and uses his whole hand to pull the candy. Not a good idea. I use my fingertips only when I pull the candy. I also keep pulling it. Don’t stop to lay it down for more than a second or two, if you are stopping to butter your hands. Try not to use too much butter. As soon as you stop pulling, the candy starts to turn. If you haven’t pulled it long enough when you lay it down, it will turn right into a sugary clump. I know! My husband has done it a few times. Lol. I don’t suggest adding ANYTHING different to this recipe. I’ve been making this candy for 40 years and I’ve tried many different recipes. This one is the best. No need to add vinegar, baking soda, or anything else. It just takes some practice. I flopped several batches in the beginning. Don’t give up either, but try to find you a scrap piece of marble before you make it again. Good luck, and please feel free to reach out to me if you have any further questions.
Cindy
Try looking on Marketplace on Facebook for marble pieces.
If your “taffy” suddenly turns to sugar, you can melt that clump in milk, add some cocoa and butter and make fudge. No harm, no foul.
Thanks for sharing your thoughts.
Hi Jenny, You’re so welcome! Merry Christmas!!
I tried this candy so many times in years past and swore I would never try it again. But I really want my mom to have a good batch for Christmas. Once again something went wrong. I have a nice marble slab that I keep in the freezer and when I poured and cooled the candy and started to pull, the candy was so stringy and would not stay together. I kept at it and eventually I got it to pull somewhat….I pulled out the rope and cut into pcs. and they just ended up looking like a melted blob. My feeling is that I did not cook the recipe long enough? I calibrated my candy thermometer before hand but maybe 260 is not long enough? I have seen other recipes say to cook to 265 and some to 260. Help please.
Hi Sonya,
I’m so sorry it didn’t turn out. It sounds like your marble slab was very cold, so that’s not the problem. Usually, when I flop a batch, it ends up being my candy thermometer. I’ve started using a digital one. I’ve even placed two on the side of my pan at times when I used the glass ones, although you said you calibrated yours. It truly sounds like you didn’t cook it quite long enough if it’s real stringy. Have you ever tested candy in cold water? If it forms a hard ball in cold water it’s ready. Also, try not to go overboard with buttering your hands. My husband has this problem. He has hot hands and keeps buttering them. This can make the candy suddenly turn into a crumbly hard mess or if undercooked, even more stringy. Please don’t give up. Try one more batch. If you’re not sure about testing candy in cold water, check out my post under my candy category. Good Luck and let me know how it turns out!!
Thank you for this recipe. My grandmother used to make this every Christmas season with my parents help and I was fortunate to help her in her very old age when her arthritis prevented her from pulling the candy. I lost the recipe a few years back and was happy to come across your site. I just made a batch without a candy thermometer but used the cold water technique that grandma Martin taught me.and it turned out perfect. Thanks again.
Hi Andy,
I’m so glad it turned out perfect for you! I’ve tried many recipes for this candy over the years, and this one is the true winner for me. These days, I’ve started freezing some of it as soon as I pull it. Some of my family loves it that way, because it stays like taffy. Have a great Christmas holiday and makes lots of candy! 🙂
Hi there. I attempted this for the first time this week and had pretty good success. The taste is there, but the very outer texture is a bit gritty. The inside is creamy and tastes great, but it doesn’t quite melt in your mouth because of the harder outside. Can you help me figure this out? Also, when you let it sit overnight, is that OUT? Like on the countertop? I was worried that it was drying out on the outside and that was the reason for the texture. I panicked after a few hours and put it in a tin in the fridge to finish. Any thoughts on the candy creaming in the fridge vs. the counter? Finally, when my grandmother served these, they were presented as smooth, round balls – not the tubular pieces with ridges. Have you heard of cutting the piece then rolling it into a ball? Thanks for all of your help! This has been a really fun journey for me!
Hi Tyler,
Rolling it into balls is a new one for me. But as long as it creams, I don’t guess it matters. As far as leaving it out, I cover it with a large lint-free kitchen towel overnight. I don’t suggest putting it in the fridge at all. This slows down the creaming process. As a matter of fact, some people love this candy when it’s first pulled, (in the taffy stage), so they cut it into pieces, wrap them, and keep them in the freezer so they won’t cream. The only thing I can figure about the outside being gritty, is if you might have over-pulled it a bit, and it was starting to turn slightly as you were pulling it out. I hope this helps! Happy Holidays!! Cindy
I’ve tried this twice, the first time it seemed to work, but the second time it was hard the next day. Both times the color was quite a bit darker than your photos and I used a digital thermometer to 260, what might I be doing wrong?
I am using cold marble as well
Hi Sherry,
If it’s darker, it’s been overcooked. No matter how expensive the thermometer, they can be off. Do you have a second thermometer? It also needs to be pulled for a few minutes until it’s no longer shiny but has a sheen. Don’t give up. See my post on calibrating candy thermometers. Good luck! Happy Holidays!
Cindy
I made it success finally. Did second Match Did not do kinda lío taffy. I will krep trying
Hi Carolyn,
I’m so glad it turned out. You keep trying. It will get easier! Happy Holidays!
Cindy
Carolyn,
My wife, mother-in-law and myself tried your recipe twice tonight. Both times while we where trying to pull it turned to crumbles all at once. The second batch was somewhat better but crumbled while we where pulling it.
I have 2 questions, 1) How long do you let it rest on the marble slab before trying to pick it up?
2) How long do we need to pull it? It was so hot that we couldn’t keep it off the marble and it never really changed color all that much.
We haven’t given up, as we’re going to try again tomorrow..
Thanks for your recipe and any advice you could give us.
Merry Christmas from Trimble Co. KY
Hi Will,
Was your marble slab cold? I place mine outside overnight and get it really cold? If the candy stays too long on the marble before pulling it will turn sugary. I pour mine on the marble slab. After 30 seconds, I take a metal spatula and turn each long side inward towards the middle. Then I move the candy with my hands to the coolest parts of the marble, turning it over once. I cut in half, (if someone is helping me pull). Then we start pulling it with our fingertips. I don’t use the palms of my hands to pull this, only fingertips. When cooking it, make sure your candy thermometer is accurate. If this candy starts to turn brown, it’s been overcooked. When it turns to a clump, it’s either overcooked or you waited too long to pull it. Let me know if you have any more questions. Good luck and Merry Christmas!
Cindy
My great grandmother passed this recipe down to us, but I found yours while looking for more exact temperatures, as I don’t like judging the hard ball in a glass method. Lol.
I pulled and pulled and it was looking great, then it suddenly started turning to sugar. Did I pull too long? Or would the fact that I live in Florida and its humid here affect it?
Hi Sarah,
It sounds like you might have pulled it too long. As soon as it will hold ridges when you pull it out it’s ready. I personally don’t believe in the humidity thing. I’ve pulled this candy in all kinds of weather and it turns out great. You could’ve overcooked it some. If the candy starts to turn brownish when cooking, you’ve overcooked it. Don’t give up!! Merry Christmas!
I should say, it began to revert back to a very soft, sticky mess that I could not even handle, and then it turned to sugar.
Mine did this as well! It was so perfect! Looking great! Then got sticky again and then crumbled in my hands it’s got the creamy taste and the beautiful white color but I just can’t figure out what happened!? Do you know yet?
Ms. Cindy,
Thank you so much for your recipe & instructions. You’ve helped me tremendously. I’ve got it working pretty good & tastes spot on. It just a little hard and gritty after it creams. Not so much that you can’t enjoy it, I’d just like it a little creamier & softer. Any thoughts?
Hi Alan,
I think you might have overcooked it a little bit. Also, make sure you’re pulling it until it holds its ridges when you stop pulling it. Don’t give up. Merry Christmas!
Needing some suggestions with making this cream candy. The first time I tried the recipe it did not cream it stayed in a taffy stage and became hard. The second time that I tried it, we pulled the candy longer. It did cream and turn white. We left it on the marble all evening. The next morning the outside takes sugary but the inside has the cream candy taste. It is not light or melt in your mouth. Any suggestions?
Hi Rebecca, First I’d like to say, don’t give up! I made batch after batch of this candy years ago before getting it right. In regards to the first batch, it sounds like maybe it was either undercooked and/or wasn’t pulled long enough. The second batch… did you cover the candy overnight as it creamed? It sounds like you pulled it too long before putting it down. Another thing… are you using a candy thermometer or testing it in cold water? I have had many candy thermometers that were inaccurate over the years. I want you to make a perfect batch, so contact me with any further questions or comments! Good luck!
Thanks for sharing your recipe. I am excited to try it. The recipe I was given was for 3 cups of sugar..1/8th tsp of baking soda and 1/8th tsp of salt..1 cup of cream and 1/2 cup of water. Stir dry ingredients then add boiling water and cream. The main issue I have is knowing when to stop pulling. I have had some not hold lines that have turned out to be the best batches.. Some are gritty.. Some turn to a hard ball right in your hands while pulling. I love a challenge that is why I love making this candy. But I am going to give your recipe a try.
Hi Stephanie, Don’t give up on the challenge! 🙂 It takes a few batches to get it right every time. I’ve tried many recipes over the years and this is by far my favorite. It’s more flavorful and turns out perfect a lot more often. Good luck!!
Awwww. The memories of my Kentucky born (Ashland) mom making this magical recipe. Her recipe is almost the same, but she always added a pinch of soda. I guess I know what I will be doing this evening. I can’t wait to taste the best bandy in the whole wide world.
Hi Kathy, Isn’t this the best candy ever!! So many people haven’t heard of this wonderful Kentucky secret. We are blessed that we have enjoyed it. 🙂
I really enjoyed reading the history you posted. My grandmother grew up in kentucky. Per my family verbal history, my great grandmother worked in a candy shop and learned how to make this recipe. My grandmother taught me how to make it and I still have her marble slab. She has passed now but would be about 95 years old now. She always put a walnut on top of each piece before it set. I have made several batches and most turn out well.
Hi Amy, What great memories! I hope you keep making it. There aren’t many of us that still know how to make this wonderful candy.
How do you keep it from sticking to your hands? I tried a damp cloth or a little butter but it never set up hard enough to cut?
Hi Donna, I use a small amount of butter if it’s sticking, but I also pull the candy with my fingertips only. If you naturally have warm hands and pull with the palms of your hands, the candy will stay too warm. Also, if it’s that sticky, it might be undercooked. If it’s too soft, it’s either undercooked or underpulled. I hope this helps!
I came looking for a recipe, but I wanted to leave a comment for anyone looking at purchasing it from one of the makers you listed. Of those listed Ruth Hunt is the best. I used to say it was Mom Blakeman’s by a mile…it was perfect. But a few years ago the company sold and for some god forsaken reason they tweaked the recipe….it doesn’t qualify as cream candy any more in my book. Greasy and gritty.
Hi Shane, Thanks so much for the feedback. I’ve tried them all, but I will have to say homemade is better than all of them. Of all the purchased ones, I agree with you…Ruth Hunt. I loved this candy so much that I tried making it as a teenager. Needless to say, it didn’t turn out for me back then. It took a few years to master it and it was SO worth it. I hope you get to indulge in some soon!
Do you suppose to stir the sugar and water and pinch of salt because mine is burning on the bottom after I put the heavy whipping cream in
Hi Melissa, Did you follow the specific steps in my post? It should never burn. The heat should be reduced before adding the cream, then add the cream slowly. I’m sorry yours burned.
But do you stir sugar water and salt or just put it in and let it boil
We were with friends in a taffy shop in Tennessee this weekend and I mentioned Cream Candy. I was shocked that they had no idea what I was talking about…I guess I never knew it was a ‘Kentucky thing.’ I made it with my aunt once when I was a child (about 8 yrs. old). Though I am pushing 60 now, I have such vivid and heartfelt memories of the magical experience–down to the sight of the taffy on her antique marble-topped table, getting a taste of the warm taffy before it creamed (my favorite), and then popping a piece in my mouth and letting it slowly melt. Thank you for taking me down memory lane!
Hi VSM, You are so welcome! Those are the best memories, and my family is the same. They love to eat it when it’s like taffy. I have to hide it to let it cream. Lol.
Love this recipe! Turned out great! Will be making it a lot. How long will the candy keep for? How far in advance can it be made and stay as it should?
Hi Erica, I’m so glad it turned out for you. So many people struggle with this candy the first few times they make it. As with any candy it’s best when really fresh. However, once it’s creamed, you can place it in an airtight container and refrigerate it until you’re ready to eat it. Also…something I just found out myself lately. Some people love to eat this in its taffy form when it’s first made. I know a lady that makes it and freezes it right away once she cuts it into pieces. She has many people wanting it frozen. I don’t freeze any, but thought that was good to know.
Thanks for sharing your recipe. Try making this candy in Florida and humidity will definitely play a factor. I’ve made this candy so many times and I’ve had much success. But, if the humidity is high I can make 10 batches in a row and they will all fail. Florida humidity has to be different than Kentucky humidity.
Hi Leah, Yes, it must be. I make it year ’round here in Kentucky. It’s certainly very addicting! 🙂
Do you sell your pull candy if so let me know I have a friend that wants to buy some and Thank you in advance!
Hi Leatrice, Unfortunately I don’t I don’t have time. Here is a lady I know that sells it… https://www.facebook.com/robin.s.joseph3/.
How can you keep the candy fresh for up to 2-3 weeks? Can you freeze it or does it make it hard?
Hi Ryann, You can freeze this candy as soon as you pull it. Some people love to keep it frozen and eat it in the taffy form, or you can allow it to cream and freeze it.
I grew up in Tennessee and I have been looking for this recipe for a long time. What is the size of your marble slab? I have a marble slab but it is only about 16” square. Do you think that is large enough to work with? I’m excited to try your recipe!
Hi Jon, My marble slab is about 1 foot wide by 2 1/2 feet long. It might work…the problem is you need room to spread the entire batch thinly over a very cold surface. I’m not sure if that’s quite big enough to spread the hot mixture thin enough. I’m assuming you have a second person to help you pull it. Maybe you could freeze a cookie sheet to pour a little of it on the first time you make it, and see how much your piece of marble will hold. The cookie sheet won’t stay cold as long. If you have a scrap piece of anything thick enough to stay cold, that will work.Good luck, and let me know if you have any more questions.
My grandmother, then her son (my Dad) made this candy. But they were never in Kentucky so no idea where they got the recipe. I remember my folks taking turns pulling it. I still have the hook! They laid it on a piece of buttered marble countertop that came out of my great grandmothers kitchen. I still have that too! They laid it out to “dry”? But scored it not cut it. They covered it with fabric for the night. The next day we broke it into the little scored pieces and put it in little aluminum cans that were wrapped in red and white stripped paper and sold it for Christmas.
So loved that candy!
Hi Barbara, Thanks for sharing your great memories of this candy!
Hello! I’ve made this recipe a couple times. The first time it came out perfect! The second time I think I got the batch too hot too fast. And every batch since then I have had it turn to sugar in seconds. How do you get the marble to stay buttered? I have put it in the fridge so that it is nice and cold, but can’t get the butter to stick and the candy ends up sticking to the slab something terrible! I feel defeated but it makes me want to try harder to get it right.
Hi Samantha, Regarding the marble slab, I freeze mine. In the winter I place it outside overnight. Then I drag a piece of butter over it. The butter will freeze on the slab at first but will melt quickly when you pour the candy on it. If you don’t pull it long enough it will turn to sugar and if you over cook it…it will also turn to sugar. I pour it on the slab, then I sprinkle it with vanilla. I leave it for about 30 seconds and use a metal spatula to go along the edges and turn each side into the center. It will be in a long strip. Then I move the strip from the center to one edge where the marble is cold, then back to the edge on the other side. I use the edge of my metal spatula to cut the strip in half, if someone is helping me pull it. I try not to over butter my hands. Instead of pulling it with the palms of my hands, I use my finger tips. When other people help me pull this candy, they will use their palms which are hot, then the candy sticks to their hands and they keep using more butter. You shouldn’t have to use a lot of butter if you’re pulling it correctly. I hope this helps. You might also want to calibrate your candy thermometer to make sure you’re not over cooking it.
I did exactly what recipe said after taking lid off and turning down to medium. My thermometer immediately shot up to 300 after al the water boiling for 5 min.
Hi Betsy, It sounds like your thermometer. Try checking to see if your thermometer is correct. You can do that here… https://mycountrytable.com/calibrate-candy-thermometer/.
I don’t have a marble slab. Can I use the countrrtop?
Hi Merritt, Unfortunately, you need something portable that you can place in the freezer or outside where it’s really cold. The surface you pour the candy on needs to be VERY cold. Once you pour the boiling hot candy on it, it will cool in seconds. Otherwise, you’re candy will stay hot for too long before you are able to pull it and it will turn into sugar.
I tried making a different recipes years ago and failed miserably. I was happy to find your detailed recipe and made it twice this weekend.
The candy creamed both times but did not cook to a brownish color and did not retain the ridges after it was cut. I pulled it until the surface was ridged and almost chalky the second time.
I would appreciate your input re: how to solve it not holding the ridges. Thank you so very much!
Hi Ruth, This candy can be tricky! Sorry it didn’t turn out for you. The first thing I recommend is double checking your candy thermometer. I’ve pitched SO MANY candy thermometers over the years. You can also calibrate the candy thermometer and adjust the temperature by the amount that it’s off… https://mycountrytable.com/calibrate-candy-thermometer/. You commented the candy did not cook until it was a brownish color which is good. Many candy makers overcook this candy. It should never look brown, only slightly cream colored at most. It sounds like you undercooked it a bit, if it didn’t hold ridges after pulling it. Double check your thermometer, and make sure your marble slab is very cold. It’s very important to pull the candy the minute you can stand to hold it in your hands. Otherwise, if your marble slab isn’t cold enough, it will take longer for the candy to cool enough before pulling it. The candy can turn to sugar or look chalky when you’re pulling it. Make sure to pull it long enough. I can tell when it’s time to lay it down when the texture starts to change. I use my fingertips to pull this candy. My husband, who sometimes helps pull it, uses the palm of his hands and he has hot hands. His tends to stick to his hands and he keeps stopping to add more butter. His sometimes turns to sugar. Too much stopping and too much butter . One more tip…if you pull this candy in a horizontal movement, your arms will get tired. I hold my left hand up in the air and let gravity help pull it down with my right hand. I hope this helps! I know it’s the holiday season and I hope this candy turns out for you!!
Cindy – thank you so much! I did calibrate my thermoters and also cold water tested it. I believe I may not have pulled it long enough. It does taste ultra-creamy and DELICIOUS! Happy holidays to you!
Ruth
You were absolutely right. I cooked to firm ball, not hard ball!
Bless you!!
Ruth
Hi Ruth, I’m SO glad it turned out for you…and just in time for the holidays!! 🙂
Thanks for the recipe! I have a question. It was a little sticky at first, we pulled and pulled and then layer out to cut, BUT it was sticking to the counter top so bad that we peeled it back up and continued pulling. It was looking and feeling GREAT! Then all of a sudden it reverted back to being sticky again… then… it turned to a clump of dried crumbly sugar! I was devastated! It still tastes good but what happened!? Thanks for your time
Hi Jessica, It sounds like you undercooked it. Once you under cook the candy, you’ll keep pulling it waiting for it to form ridges, and you’ll end up pulling it too long. Then once you stop pulling it for 30 seconds, it will turn to a sugary clump. I recommend checking your candy thermometer to see if it’s accurate. Also make sure your marble slab is very cold. This matter as well. The candy needs to be able to cool enough for you to start pulling rather quickly. See my post about calibrating your candy thermometer…https://mycountrytable.com/calibrate-candy-thermometer/.
Read the recipe several times. Purchased a marble board. Turned to sugar. Disappointed. Candy is an art form, I guess.
Your recipe is very similar to mine. The only difference is that I use three cups of sugar, 3/4 cup of water, a pinch of salt and a full cup of heavy cream. Your process is the same as mine. I have several candy thermometers and none of them are completely accurate. I use the thermometer to let me know that the candy is nearly ready. Once reaching 260-262 degrees, I remove the thermometer and then watch the candy mixture. When it starts turning a very light brown, I immediately pour it on my marble slab. During the pulling process, the candy will lighten in color. While pulling the candy, I will often step to the back porch and finish up the pulling. I often had problems with my candy sticking to my buttered slab. Substituting a small amount canola oil on my slab seems to work better for me. Also, using an oiled pastry scraper makes moving the hot candy around on the marble and picking it up to pull much easier.
Hi James, Thank you for sharing your tips on making this delicious candy. Merry Christmas!
First time, and it turned to sugar. Can you suggest ways I can use the ‘failed cream candy’ or do I throw it out?
Hi Catherine, I’m sorry but you can’t fix it at this point. Read some of the other comments for my tips on this. Don’t give up!
I have tried twice, both times when I start to pull it turns back to sugar. Please help!! Is there a recipe for fudge that you can reuse the sugar?
Thank you, Donna
Hi Donna, Was your marble slab cold? I place mine outside overnight and get it really cold? If the candy stays too long on the marble before pulling it will turn sugary. I pour mine on the marble slab. After 30 seconds, I take a metal spatula and turn each long side inward towards the middle. Then I move the candy with my hands to the coolest parts of the marble, turning it over once. I cut in half, (if someone is helping me pull). Then we start pulling it with our fingertips. I don’t use the palms of my hands to pull this, only fingertips. When cooking it, make sure your candy thermometer is accurate. If this candy starts to turn brown, it’s been overcooked. When it turns to a clump, it’s either overcooked or you waited too long to pull it. If your marble slab is not REALLY COLD, you will have to wait longer to handle it, thus turning it to sugar. I’m not sure what you mean by reusing the sugar in fudge.
Do you have a video of you making the Kentucky pull candy
Hi Debbie, Not yet. However, due to the large amount of questions I get on this recipe, I plan to make one.
I’d like to try making a peanut butter version of this, but haven’t found a recipe anywhere. I know it’s possible because I’ve had the Mom Blakeman’s version. Any ideas?
Hi, I’ve never heard of a peanut butter version. Sorry, I can’t help you. I’ve never tried it and would be afraid to advise, since peanut butter has oil in it.
When I first started making cream candy, I had many batches that quickly turned into a granular form and just fell through my fingers. I soon learned that all utensils, marble slab, and hands must be completely clean as just one grain of sugar coming into contact with the candy during the pulling process will cause the entire batch to granulate. Before I make candy, all utensils are washed in the dishwasher, the marble slab scrubbed in hot soapy water and then thoroughly rinsed with hot water. I clean my slab the night before and place it on my back porch covered with a clean towel so the slab will be col the next day. While making candy, I wash my hands thoroughly after each step and especially before the pulling process. Keeping everything clean and free of residual sugar will ensure a successful batch of candy. Also, when bringing the sugar and water to a boil, placing a lid on the pot and allowing the syrup to boil 5 minutes, the steam produced will assure all grains of sugar have been dissolved into the syrup. When following these steps, I rarely fail in making this candy!
I purchased some of momma blakemans and holy cow.. I’m pretty sure she had to make it shelf stable. There is like 50 ingredients in it. I was hoping for something more simple and clean.
Hi Ian, I’ve tried her candy years ago. Sorry, but I didn’t like it. If you make homemade cream candy just one time, you’ll be hooked for life and you’ll gain weight too. Lol. It’s simply melt in your mouth delicious!
Hello! I am very interested in making pull candy. But, I want to make sure I get the correct items to make the pull candy. Can you advise on what type of marble slab I should purchase?
Hi Chelsia, Any type of marble slab will work, but it needs to be big enough for the hot candy to spread on. Also, the reason marble is used, is because it holds its coldness. My piece is about 1 foot x 3 feet. It’s big enough, yet not too heavy to carry. I place it in my big freezer or in the winter time, outside.
HELP! I had this candy about 30 years ago, didn’t know what it was called or made of. A few weeks ago we went to the Woolfest. I thought it looked familiar so I bought some. 5 little pieces for 7 dollars. As soon as I tasted it, I said to my sisters and Mom this is it, this is it! the candy I had 30 years ago, it’s it! They tasted it and agreed. So I ha.ve been obsessed with finding the recipe, so yours sounds like it’s the one. I made it tonight. I did everything you said, and as I am pouring it onto the marble, i thought it was going to run off, but ir didn’t.. its looking like your pictures, i am moving it to the cold parts of the marble, trying to pull it but it was to hot. So I was trying to stretch it with my spatula and it all the sudden turned to this hard sugar. What did I do wrong?
Hi NaTania, First of all, don’t get discouraged. When I started making this candy years ago, I flopped several batches. I’ve learned a few things since. First, you don’t have to stand out in the cold to pull it like many did years ago. Second, make sure your candy thermometer is correct, if using one. When it turns to sugar, it’s usually overcooked OR you’re waiting too long to start pulling it. Are you using a very cold marble slab? This is important. Even with a very cold slab the hot candy cools the slab down within seconds, but the very cold slab allows it to cool quick enough to start pulling. Also, don’t use the palm of your hands to pull it. It keeps the candy too warm for too long. I use my fingertips to pull it. Years ago, I would pull the candy vertically across the front of me, using my arm muscles too much. Hold it at an angle up in the air and allow gravity to help just one of your hands to pull it down while holding it up with your other hand. Some people use a hook which does the same thing. It’s easier if you have a second person pull half of it too. If you’re cooking it and it starts to turn brownish in color, you’re overcooking it. I see people make and sell this at places like Woolfest, but it’s brown looking and I would stay away from buying it. I place my marble slab out on my deck until it’s very cold. This is the most important thing…cold…cold…cold. Otherwise, by the time it cools enough to handle it will turn to sugar. If you have any other questions don’t hesitate to contact me. Good luck!
I’m wondering at what point in this process I would add the flavorings???
Hi Lucinda, Once you pour it on the slab, you drizzle the vanilla over it.
I love your recipe so much. So easy. I also get warm hands so I quickly lay on the slab of marble.
I’ve made two batches in the past two days. Neither went well. Yesterday they were chewy and hard after sitting. Today’s had much better color at the end. More of a creamy color. After sitting all day they are grainy and chewy. I have a lot of trouble when pulling the mixture. I end up with big globs in both hand. When I pull it apart the center of the candy is very thin., like its too hot. But it’s not hot to the hand. Every step before the cooling point seems to be fine. I use my granite top and cool it to 29 degrees.
Hi Scott, I just made two batches today. If it turns into big “sticky” globs, then it’s undercooked. If you mean a “sugary hard” glob, it’s overcooked. First question…are you sure your candy thermometer is accurate. I’ve had SO many that haven’t been correct. Here’s my link on testing your candy thermometer…https://mycountrytable.com/calibrate-candy-thermometer/. It sounds like your granite is plenty cold enough. Some people have hot hands. My husband has that problem. His turns real sticky and I have to take it from him and pull it. Try putting your hands in some very cold water before you start pulling it. Don’t pull it too slow. My husband is guilty of this as well. I pull mine at a moderate speed…trying to keep movement in the candy at all times. If you pull the candy really slow, it’s not going to turn out right. For example…mine turns out like soft taffy, then it creams pretty quickly. Then it melts in your mouth. If I let my husband help, he pulls really slow and his stays like taffy for a good day, then turns sugary. I’ve pulled this candy for many years, and I’ve seen it all with things going wrong. Pull it at a moderate pace and pull it apart to about a foot each time, then double it over and pull again. I also pull it with just my fingertips…not the palms of my hands. If you have more questions let me know. Good luck!
I had calibrated my digital thermometer before I made the recipe.
There is no way I could pull the Candy with my finger tips. I have to use two hands to pull the glob of candy in one of my hands. I have to put it back on the counter to get it in a shape to pull again. It never pulls evenly.
When I first poured the candy on the countertop it’s almost 2 feet in length.
When the mixture is boiling after cream is put in the temperature is different on different areas of the boil.
Thank you so much
Hi Scott, I suggest checking the temperature along one side of the pan, and of course not touching the bottom of the pan with the thermometer. It will be two feet long. It sounds like it’s undercooked if it’s a “messy” glob.
We love cream candy. We have tried multiple times and just can’t seem to get it right. Last night we pulled our batch until we couldn’t pull any more. The candy was so hard we couldn’t cut with scissors. We literally broke it with our hands. This morning it is still hard on the outside and chewy? I am at a loss of what we are doing wrong
First time making this.
Mine has more of a crunchy outside and it didn’t turn white. Cream colored. It’s good but not how i remember it tasting. Did we pull to long or not long enough?
Thanks
Hi Evelyn, It sounds like you just need to let it cream. Once it’s not sticky to where the pieces stick together, place it in an airtight tin overnight.
I grew up in Mt Sterling, KY where Ruth Hunts store was and love this candy. My breakfast lots of mornings driving to school was a Blue Monday candy bar and a Ale 8 drink. I made this last week and it turned out great. The tips really helped and the most important one was use a very cold marble slab. I’m getting ready to make another one and try dipping in dark chocolate.
Hi Mona, I’m so glad it turned out great for you. Many people flop the first few batches. I dip some in dark chocolate for family, but my favorite is plain. I also freeze some when its first pulled and cut and still like taffy for some people. You won’t believe how many people seem to like it frozen.
Hi Cindy! Your site is the best I have seen for making this wonderful candy. So thank you for this gift. My question is can I freeze it and for how long?
Hi Vickie, Thank you for the nice comments. You can freeze it as soon as it’s made and cut, if you want to to stay like taffy. I have not tried freezing the creamed candy. I would think it would be okay too, but like most frozen things, I wouldn’t suggest freezing it for over 3 months.
I have tried this 4 times now and still haven’t got it. My husband and I are so determined to get this. Each time we’ve tried, we are able to get it off the slab, however it sticks to our hands so much. We butter our hands but it seems to only help for a few seconds. After about 4-5 minutes of pulling, it’s still brown in color (it seems to have barely lightened up at all) and it seems as if in a random blink of an eye it turns into a crumbly mess. When it flops- it flops FAST. (We use a thermometer- it’s calibrated. And I have a marble slab that I freeze in my deep freezer). However, we have been using our whole hand to pull it. I have read where you say you ONLY use your fingertips. How? Is it in the air when you are pulling or are you resting the candy on the slab. How do you pull it with just your fingertips. I imagine the candy would just droop to the floor in one pull. Any advice you can give would be greatly appreciated! We are so desperate to get this right.
Hi Lesli, I realize your candy thermometer was calibrated, but it sure sounds like your candy was over cooked. It shouldn’t be brown when it’s finished cooking…just a cream color. If it turns to sugar or into a clump, that’s also a sign that it’s over cooked. Try not to over butter your hands. It might help for a second, but it actually makes the candy more sticky. I hold the candy in the air and use my finger tips to pull it. You can pull it horizontally or vertically allowing gravity to help pull it down. Some people have hot hands, and the candy sticks to their hot hands. That’s why I like to use my finger tips. I hope you have better luck next time. Don’t give up!