Hawaiian Sweet Rolls
These Hawaiian Sweet Rolls are so light and fluffy and literally melt in your mouth. Prep them the day before and bake the day of your next holiday gathering. Oh, and you might want to double the recipe!
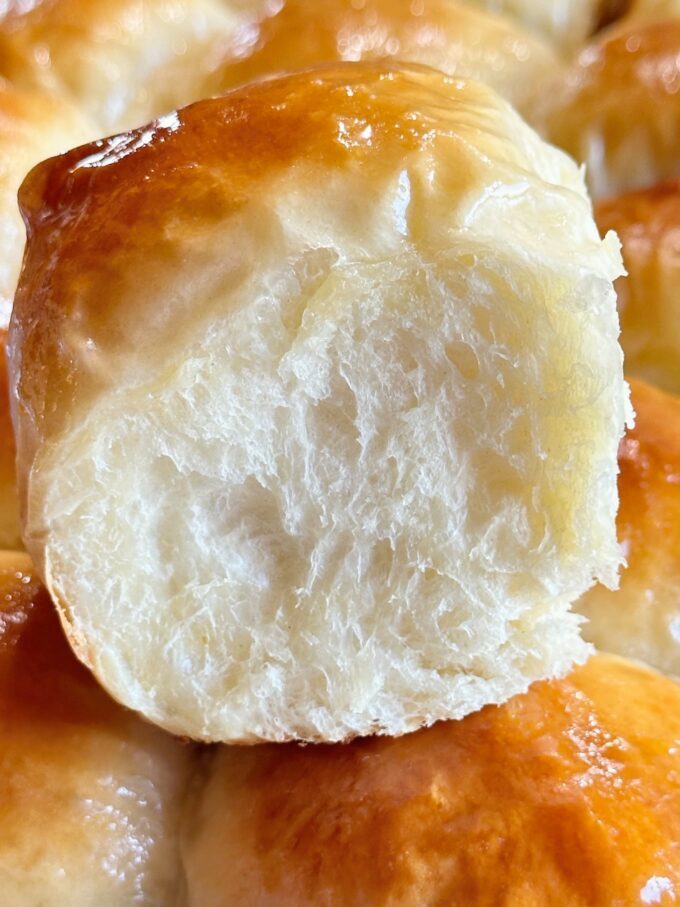
If you like the prepackaged Hawaiian Sweet Rolls you’re gonna love this homemade version. They are so soft, squishy and just slightly sweet, and you’ll be doubling the recipe for your family.
Even if you’ve never baked with yeast, I’m going to show you just how easy it is to make these delicious rolls with yeast. Don’t be intimidated by yeast. Simply make sure your yeast is not expired.
Ingredients needed for this recipe
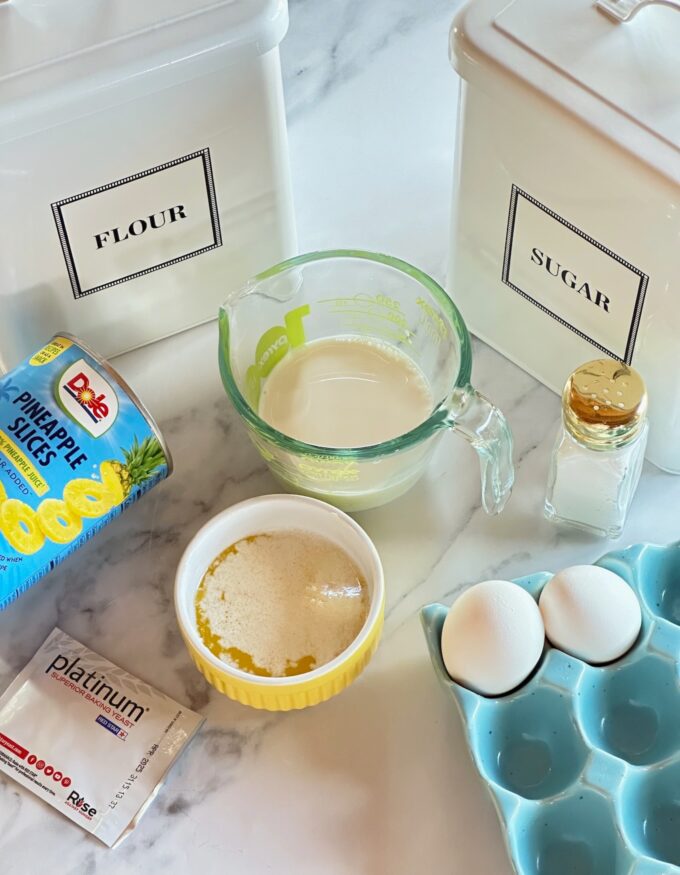
All purpose flour: Use AP flour in this recipe for a soft fluffy roll. Don’t use bread flour unless you want a chewier bread roll and chewy edges. Hawaiian rolls are suppose to be light, soft & fluffy.
Unsalted butter: Butter adds so much flavor to these soft “buttery” rolls. Make sure to brush the baked tops with butter too.
Instant yeast: Instant or Rapid Rise Yeast is used to make the dough rise, instead of using other leavening agents like baking powder or baking soda. Make sure your yeast is not expired.
Large eggs: Eggs bind the other ingredients together and add richness to the bread.
Pineapple juice: Adds flavor to the bread rolls.
Milk: You can use 2% or whole milk in this recipe. Make sure it is around 110 degrees for proofing the yeast.
Granulated sugar: Granulated sugar is the sweetener in these rolls. Hawaiian rolls are suppose to be slightly sweet.
Salt: Salt always brings the other flavors together.
How to make Hawaiian Sweet Rolls
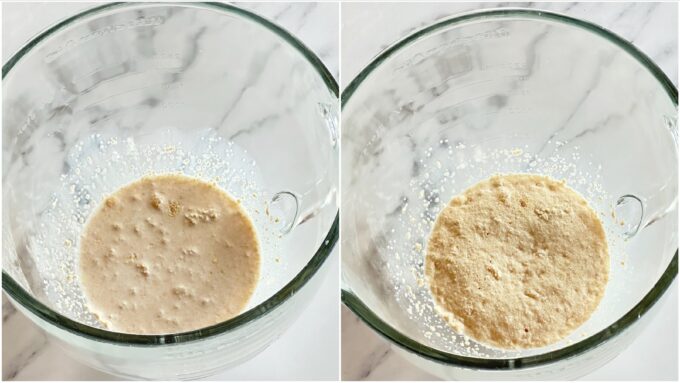
Proofing the yeast:
Add the yeast, milk and 1 tablespoon of the sugar to the large bowl of a stand mixer fitted with the paddle attachment. Mix on low speed for about 10 seconds, just long enough to wet the yeast. Allow the mixture to sit for at least 5 minutes until it looks frothy and bubbly on top. This is called proofing the yeast (to see if it’s still good). If the yeast doesn’t foam and bubble up, don’t proceed with the recipe. Check the expiration date on your yeast. Either the yeast is expired, your milk was too hot (killing the yeast), or the milk was too cold, (not activating the yeast). Start the process over, before proceeding to the next step.
Making the dough:
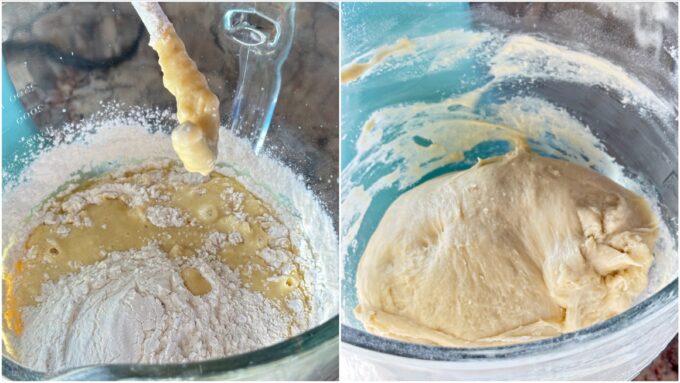
Once the yeast is proofed, using the same bowl, add the remaining sugar, butter, eggs, and pineapple juice. Mix on medium speed for about 30 seconds and switch from the paddle attachment to the dough hook. Add the salt and about 2 cups of the flour. Mix on low speed just until the flour is incorporated. Slowly add in the remaining flour, all but 1/2 cup. Scrape down the sides of the bowl, and turn the mixer to medium. Knead the dough for at least 5 minutes, until the dough pulls away from the sides of the bowl and is just slightly sticky or tacky. If the dough is too sticky, and sticks to the sides of the bowl, slowly add in more of the remaining flour, and keep kneading until you get a tacky dough that releases from the sides of the bowl and you can handle with your hands.

The First Rise:
Form the dough into a round disc and place it in a large greased bowl, turning it over once, to grease both sides. Cover the bowl with a towel, and place the bowl in a draft free warm area in your kitchen. Allow the dough to rise until doubled in size, 1 1/2 to 2 hours. Here’s what I do. I preheat my oven to about 120 to 130 degrees and turn it off before starting my recipe, leaving the oven door slightly ajar. When I’m ready for the first rise, I place a towel over the bowl, place the bowl in my oven and leave the door slightly ajar. I do make sure that the oven has cooled off enough. It should be lukewarm.

Punch down and divide the dough:
Punch down the dough with your fist or fingers to deflate it and get rid of air bubbles. Transfer the dough to a work surface, using as little flour as possible. Form the dough into a long piece and use a bench scraper to cut it into 15 equal pieces. I use a kitchen scale to weigh each piece, making sure they’re all about the same, pinching off or adding a little to each piece as needed.

Forming the dough balls:
Pick up each piece and gather it into the palm of your hand, Pulling up the corners and pinching them together on top. Turn the ball over, seam side down, place it on a flat surface, and cup your hand over it, rolling it in a circular motion until it forms a smooth ball.
Second rise and baking:
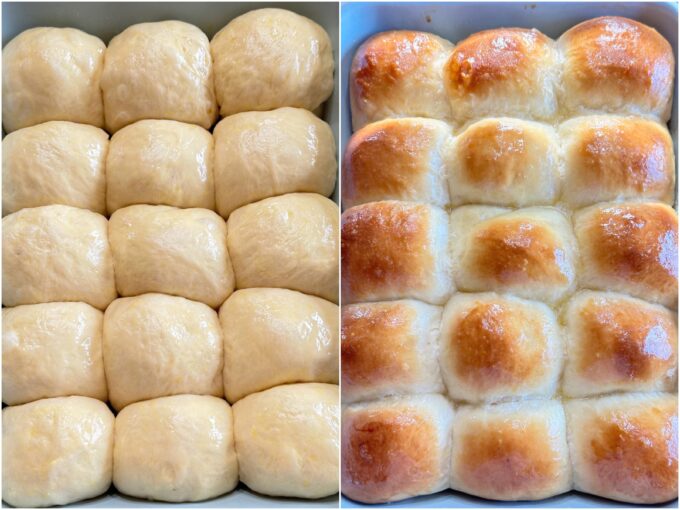
Place the dough balls in a a greased 9 x 13 baking dish, making 5 rows of 3.
Place a thin linen towel over the dish and place it in a draft free place to rise until doubled in size. It will take 45 to 60 minutes for the second rise. During the last 15 minutes or so, preheat your oven to 375 degrees.
Make the egg wash by whisking together the egg and water. Lightly brush the tops of the rolls with the egg wash, making sure to not deflate them. Bake for 20 to 25 minutes until they are golden brown on top and hollow sounding if you thump on the top of one. If they begin to brown too much on top during baking, place a foil tent over the top.

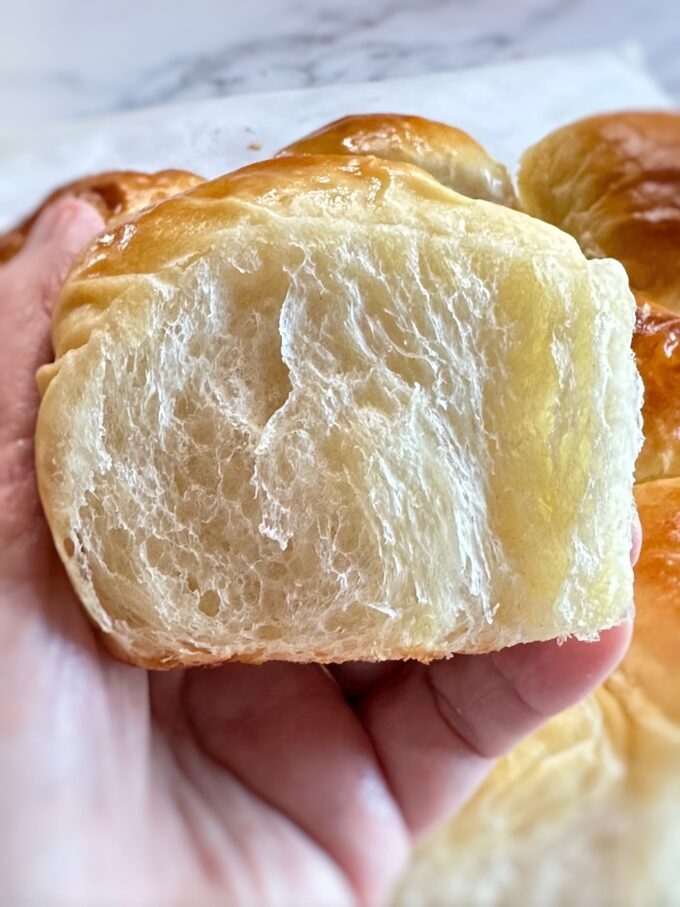
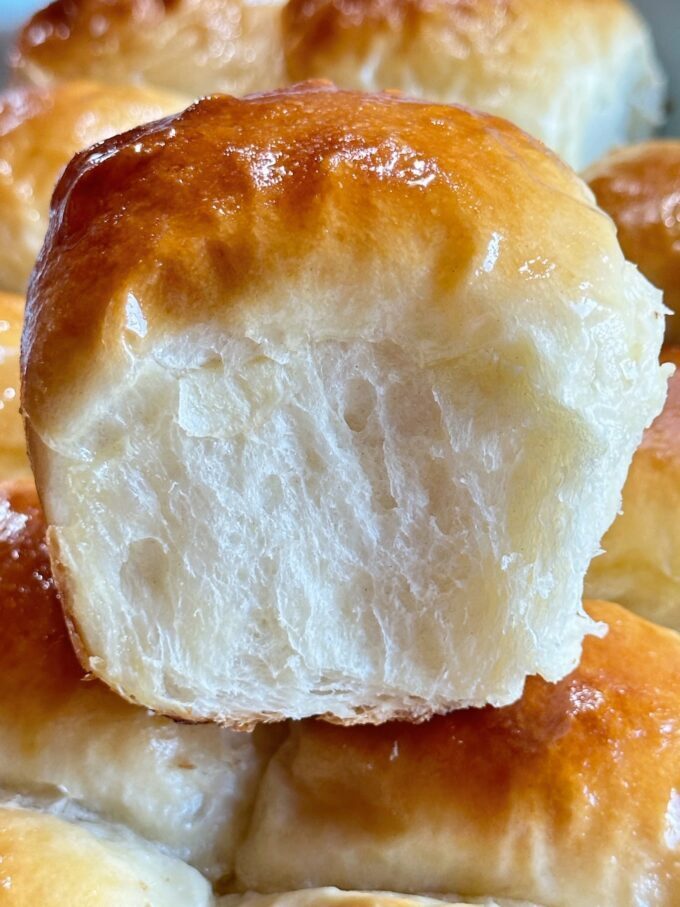
Remove from the oven and brush the rolls with butter. Allow the rolls to cool for 5 minutes before serving.
Pro tips for this recipe
- Measure the flour correctly. Too much flour equals dry dense rolls. Spoon the flour into a measuring cup and level it off with the edge of a knife. Don’t add the last 1/2 cup of flour unless you need it. This dough will be slightly sticky and tacky.
- For soft & fluffy rolls, use a ceramic or glass dish for baking them. If you want rolls that are crispy on the outside, use a metal pan.
- Use a food scale to weigh the dough balls. This ensures they will all bake up evenly at the same time. This dough recipe gets cut into 15 pieces. Weigh each piece, pinching off or adding dough to each piece until they all weigh the same. This step is well worth the effort.
- Make sure your milk is the right temperature before combining it with the yeast. It should be around 110 degrees. If the milk is not warm enough it won’t activate the yeast. If it’s too hot it will kill the yeast.
- If you’re not sure if your risen dough is ready, check it by poking the top with your finger. If it slightly springs back, leaving an indent, the dough is ready. If it springs back quickly, it’s not quite ready.

FAQ’s
Can I prep the rolls the day before?
Yes. Follow the recipe through step #4. Cover the baking dish tightly with plastic wrap and refrigerate. The next morning, remove the dish from the refrigerator, and remove the plastic wrap. Place a towel over the dish, and place the dish in a warm place to rise. I would preheat an oven to 125 and turn it off. Leave the door ajar and place the dish in the oven. Otherwise, it will take about 1 1/2 hours for the cold dough to rise. When the dough balls have risen to almost double in size, remove them from the oven. Preheat the oven to 375 degrees. Brush the rolls with the egg wash and bake at directed in step #6.
Can I use bread flour in this recipe?
You can, but I don’t suggest it. Bread flour makes for a chewier crust. These rolls are meant to be soft and fluffy, not chewy in any way. That’s why it’s best to use all-purpose flour.
Can I knead the dough by hand?
Yes. The stand mixer does a great job and it’s much easier. If you knead the dough by hand, It will probably take about 10 minutes. You should take the far end of the dough and fold it towards you, then using the heel of your hands, push the dough away with you. Turn the dough a quarter turn and repeat until the dough feels elastic. The surface of the dough should appear to be smooth and blistered.
Can I freeze the unbaked rolls?
Yes. Follow the recipe through step #4. Cover the (freezer safe) baking dish tightly with plastic wrap. Then wrap it in heavy foil and place in the freezer. When you’re ready to fix bake the rolls, remove them from the freezer.
How long will these rolls stay fresh?
They will stay fresh for about 3 days in an airtight container. To reheat, cover or wrap them and place in a 300 degree oven for about 5 minutes, or microwave them wrapped in a paper towel for about 15 to 20 seconds.

These rolls are so soft and squishy, they’re even soft the following day!

Don’t stop at just serving these rolls for a dinner side. You can use them to make so many different appetizers and sliders. Let your imagination go wild!
More dinner rolls you might like…
If you make this recipe please rate it, and leave a comment below on how you liked it. I love hearing from you!
Wanna see different recipe each day? Feel free to follow me on Facebook, Pinterest & Instagram.
Print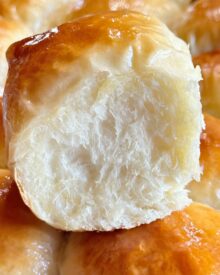
Hawaiian Sweet Rolls
- Prep Time: 3 hours
- Cook Time: 25 minutes
- Total Time: 3 hours 25 minutes
- Yield: 15 rolls 1x
- Category: Bread/Side dish
- Method: Bake
- Cuisine: American
Description
These Hawaiian Sweet Rolls are so light an fluffy and literally melt in your mouth. Prep them the day before and bake the day of your next holiday gathering. Oh, and you might want to double the recipe!
Ingredients
ROLLS
- 1 packet instant yeast
- 1/2 cup warm milk, 110 degrees (use 2% or whole milk)
- 1/2 cup granulated sugar, divided
- 5 tablespoons unsalted butter, melted
- 2 large eggs, room temperature
- 1/2 cup pineapple juice, room temperature
- 1 teaspoon salt
- 3 3/4 cups all-purpose flour
EGG WASH
- 1 large egg
- 2 tablespoons water
FINISH
- 1 tablespoon salted butter
Instructions
ROLLS
- Proof the yeast: Add the yeast, milk and 1 tablespoon of the sugar to the large bowl of a stand mixer fitted with the paddle attachment. Mix on low speed for about 10 seconds just long enough to wet the yeast. Allow the mixture to sit for at least 5 minutes until it looks foamy/frothy and bubbly on top. This is called proofing the yeast…making sure it’s still good. If the yeast doesn’t bubble and foam up, after 10 minutes stop and discard it, and start over. This means one of three things…your milk wasn’t warm enough to activate the yeast, your milk was too hot and killed the yeast, or your yeast was expired. Stop and check the expiration date on your yeast.
- Make the dough: In the same bowl, add the remaining sugar, butter, eggs, and pineapple juice. Mix on medium speed for about 30 seconds and switch from the paddle attachment to the dough hook. Add the salt and about 2 cups of the flour. Mix on low speed just until the flour is incorporated. Slowly add in the remaining flour, all but 1/2 cup. Scrape down the sides of the bowl, and turn the mixer to medium. Knead the dough for at least 5 minutes, until the dough pulls away from the sides of the bowl and is just slightly sticky or tacky. If the dough is too sticky, and sticks to the sides of the bowl, slowly add in more of the remaining flour, and keep kneading until you get a tacky dough that releases from the sides of the bowl and you can handle with your hands.
- First rise: Form the dough into a round disc and place it in a large greased bowl, turning it over once, to grease both sides. Cover the bowl with a towel, and place the bowl in a draft free warm area in your kitchen. Allow the dough to rise until doubled in size, 1 1/2 to 2 hours. Here’s what I do. I preheat my oven to around 120 to 130 degrees, and turn it off before starting my recipe, leaving the oven door slightly ajar. When I’m ready for the first rise, I place a towel over the bowl, place the bowl in my oven and leave the door ajar. I do make sure that the oven has cooled off enough. It should be lukewarm.
- Form the dough balls: Punch down the dough with your fist or fingers to deflate it and get rid of air bubbles. Transfer the dough to a work surface, using very little flour as possible. Form the dough into a long piece and use a bench scraper to cut it into 15 equal pieces. I use a kitchen scale to weigh each piece, making sure they’re all about the same. Pick up each piece and gather it in the palm of your hand, pulling up the corners and pinching them together on top. Turn the ball over, seam side down on a flat surface and cup your hand over it, rolling it in a circular motion until it forms a perfect ball. Place the balls in a greased 9 x 13 baking dish, making 5 rows of 3.
- Second Rise: Place a thin linen towel over the dish and place it in a draft free place to rise until doubled in size. It will take 45 to 60 minutes for the second rise. During the last 15 minutes or so, preheat your oven to 375 degrees.
- Bake: Make the egg wash by whisking together the egg and water. Lightly brush the tops of the rolls with the egg wash, making sure to not deflate them. Bake for 20 to 25 minutes until they are golden brown on top and hollow sounding if you thump on the top of one. If they begin to brown too much on top during baking, place a foil tent over the top. Remove from the oven and brush the rolls with butter. Allow the rolls to cool for 5 minutes before serving. See my notes in the post above for make ahead instructions.
- To keep rolls warm until the rest of your meal is ready, cover or wrap them in foil and place in a 200 degree oven.
Notes
- These rolls will stay fresh for up to 3 days if placed in an airtight container. To reheat, cover or wrap them and place in a 300 degree oven for about 5 minutes, or wrap them and heat in a microwave for 15 to 20 seconds.
Would love to make these – however the pineapple juice would kill me – can we use apple juice???
My house was cold so I ended up having to rise longer and use more flour but the end result was delicious! Definitely a keeper recipe!
Hi Katie, I’m so glad you liked them. Quick tip…you can turn your oven on to about 120 degrees and turn it off. Then place your bowl in the oven to rise. I do it all the time. It works great.
Before second rise?
Yes.
Do you preheat the oven while the rolls are in there for the second rise? My kitchen is freezing
Hi Cait, You can place them back in a luke warm oven during the first few minutes of the second rise, but you need to take them out to preheat the oven. I would cover them and place them on something close to your oven.
Can I use bread flour? I don’t have any all purpose flour right now..
Hi Kacey, You can. However, they will have a more chewy dense texture.