Coconut Easter Eggs
These Coconut Easter Eggs are the perfect Easter treats. They have a creamy addicting filling that’s covered in smooth decadent chocolate. Perfect for hiding in Easter baskets or serving on a pretty Easter platter.

Easter wouldn’t be the same if I didn’t make these decadent Coconut Easter Eggs. When I was a kid, I was fortunate to find a Graeter’s coconut egg in my Easter basket, and thought they were the best until I starting making my own.
Once you make these sweet and creamy Easter coconut eggs, you’ll be making it a tradition each Easter. You can even stash a few in your freezer for later. They’re actually delicious right out of the freezer. You might even want to double the recipe. They’re great for stuffing in Easter baskets, and they disappear fast.
I adapted this recipe from my Coconut Bon Bon #2 recipe. They’re always a huge hit, so I wanted to make them in egg shapes for Easter. If you love coconut candy you should also check out my recipe for Coconut Bon Bons made with desiccated coconut.
Ingredients for this recipe

Chocolate: Use good quality chocolate for this candy such as Ghirardelli baking bars. I use Ghirardelli 60% cacao bittersweet baking bars, and for this recipe you’ll need between 4 and 5 bars, depending if you want to swirl extra chocolate across the tops. Don’t use melting wafers. Their flavor doesn’t even compare to good chocolate. Don’t use chocolate chips either. Chocolate chips contain stabilizers to keep them from melting in baked cookies, therefore, they don’t melt as easily or as smooth as bars of chocolate. Since this candy is sweet, I recommend using semi-sweet or bittersweet chocolate instead of milk chocolate.
Butter: Make sure to use unsalted butter and have it at room temperature for this recipe. Butter adds great flavor and creaminess to this candy.
Powdered Sugar: Powdered sugar adds sweetness to this candy and helps bind the other ingredients together.
Sweetened Condensed Milk: Make sure to use SCM in this recipe, not evaporated. They aren’t the same. This milk adds sweetness and creaminess to this candy, and a simply wonderful flavor.
Sweetened Flaked Coconut: Make sure to use “sweetened” flaked coconut, not unsweetened or desiccated. Some brands of coconut have longer shreds of coconut than others. If your coconut has long shreds, place it in a blender and pulse a few times.
Vanilla: Make sure to use pure vanilla extract, not imitation. Pure vanilla extract enhances the other flavors in the candy.
How to make Coconut Easter Eggs

Make the coconut filling
Add the coconut to a blender and pulse 2-3 times and transfer it to a large bowl. Add one cup of the sugar, the butter and vanilla and mix to combine. Add the milk and the rest of the sugar alternately and mix until well combined. It’s easier to mix using your hands. Cover and refrigerate the mixture for at least 30 minutes.
Shape the eggs
Form the mixture into eggs. You can do this with an egg shaped cookie cutter or use a 1 tablespoon cookie scoop. I don’t suggest using any more than 1 tablespoon of the coconut mixture per egg. If using a cookie scoop, place a scoop of the mixture into your hand and form it into an egg shape, between 1/2 to 3/4 inch in thickness. Use your fingers to form one end more narrow than the other end. Refrigerate the eggs for at least 30 minutes.
Melt the chocolate & dip the eggs

Don’t overheat the chocolate. Melt the chocolate in a microwave safe bowl or cup in 30 second increments. Stop and stir the chocolate after each 30 seconds. You can also use a double boiler to melt the chocolate.
Once you melt the chocolate, allow it to sit for about 5 minutes to cool down, before dipping the candy in it, or the candy will be prone to falling apart in the warm chocolate.
The melted chocolate should be thin. If it’s too thick, add about 1 teaspoon of vegetable or canola oil to it and mix with a spoon.

Place each egg on a fork and dip it into the chocolate, scraping the bottom of the fork across the edge of the bowl or cup after dipping it to remove any excess chocolate before transferring it onto a parchment lined baking sheet.
If you have extra chocolate, you can drizzle it over the tops of the eggs in a zigzag motion for an added special touch. Allow the first coating to sit about 5 minutes first. Allow the eggs to sit for at least 2 hours before transferring them to an airtight container, or you can refrigerate them for a few minutes to allow the chocolate to set up.
This recipe yields 48 coconut eggs if using a 1 tablespoon (small) cookie scoop. It yields 30 if using a 1 1/2 tablespoon (medium) cookie scoop. I prefer using 1 tablespoon. I think they’re the perfect serving size.

If you make this recipe please rate it, and leave a comment below on how you liked it. I love hearing from you!
Wanna see different recipes each day? Feel free to follow me on Facebook, Pinterest & Instagram.
Print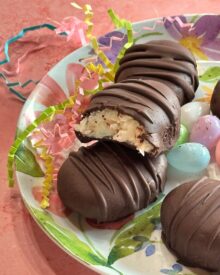
Coconut Easter Eggs
- Prep Time: 2 hours
- Total Time: 2 hours
- Yield: 48 1x
- Category: Candy
- Method: Microwave
- Cuisine: American
Description
These Coconut Easter Eggs are the perfect Easter treats. They have a creamy addicting filling that’s covered in smooth decadent chocolate. Perfect for hiding in Easter baskets on serving on a pretty Easter platter.
Ingredients
- 1 can Sweetened Condensed Milk
- 1/2 cup (1 stick) real unsalted butter, softened
- 3 1/2 cups powdered sugar
- 1 teaspoon pure Vanilla extract
- 2 packages of sweetened flaked coconut, 14 ounces each
- 20 ounces of good quality bittersweet chocolate bars for dipping (I used Ghirardelli 60% cacao, bittersweet chocolate bars).*
Instructions
- Make the eggs: Add the coconut to a blender and pulse 2-3 times and transfer it to a large bowl. Add one cup of the sugar, the butter and vanilla and mix to combine. Add the milk and the rest of the sugar alternately and mix until well combined.
- Using a 1-tablespoon cookie scoop, scoop out several scoops of the mixture onto a waxed paper or parchment lined cookie sheet. Place each mound onto your hand and use your hands to form it into an egg shape, between 1/2 to 3/4 inch in thickness. Squeeze one end until it’s more narrow than the other. You can also use a small egg shaped cookie cutter. Place them back on a lined cookie sheet. Refrigerate for at least 30 minutes until the the candy is cold and firm.
- Melt the chocolate: Fill a narrow but deep microwave safe coffee mug or a measuring cup about 2/3 full of broken-up chocolate. You want to have enough chocolate to dip the candy in, but don’t over do it. I usually melt about 1 1/2 bars at one time. Microwave for 30 seconds, stir with a spoon, and microwave for an additional 20 to 30 seconds. Stir again. If the chocolate isn’t all the way melted, microwave in 10 second increments until it’s smooth and melted. The chocolate should be thin. If yours isn’t, add 1 teaspoon of vegetable or canola oil to the chocolate and mix well. Allow the chocolate to cool for about 5 minutes before you start dipping the candy, or the candy will tend to fall apart if the chocolate is too warm.
-
Dip the eggs: Place each egg on a fork and dip it into the chocolate, scraping the bottom of the fork across the edge of the bowl or cup after dipping it to remove any excess chocolate before transferring it to a parchment lined baking sheet.
If you have extra chocolate, you can drizzle it over the tops of the eggs in a zigzag motion for an added special touch. Allow the eggs to sit for at least 2 hours before transferring them to an airtight container, or you can refrigerate them for a few minutes to allow the chocolate to set up.
- Store in an airtight container. Refrigerate if not consuming within a few days to preserve the freshness longer. You can also place them in a freezer for a few weeks. Try eating one straight from the freezer. They’re really good.
Notes
- If this is your first time dipping candy in chocolate, please read my post above the recipe card first. Then proceed to the recipe.
- * This recipe says to use 20 ounces of chocolate, which is 5 (4 ounce) bars. You might not use that much, but it’s better to be safe than sorry. The amount of chocolate used depends on how thick your chocolate is, how long you allow the excess chocolate to drip off the candy, if you decorate the tops, etc.