Butter Fan Rolls
These Butter Fan Rolls have crispy edges with soft centers, and are the perfect side for any meal. Kids and adults will love pulling apart the buttery layers. These are a great dinner roll for any occasion! Follow my easy tutorial and make these for your family.
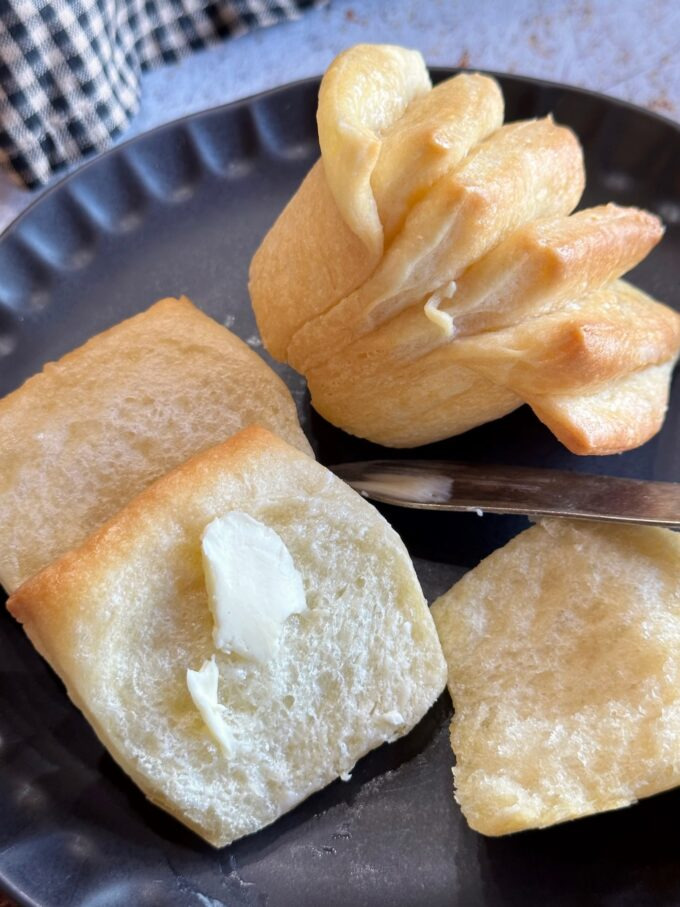
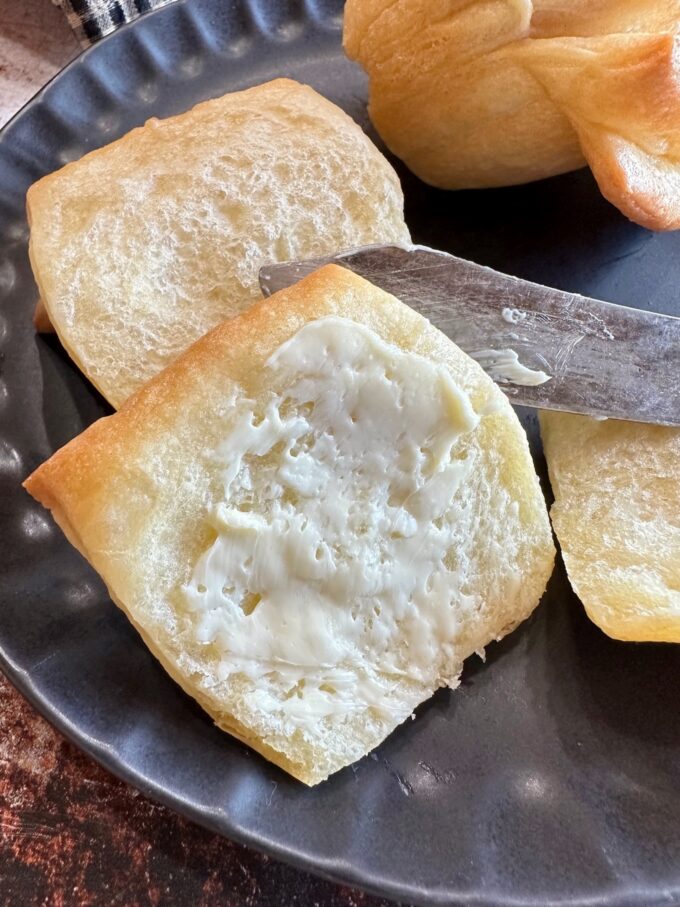
Could anything be better than the smell of freshly baked dinner rolls right out of the oven? I love these Butter Fan Rolls because you can pull them apart and butter each individual layer and savor them one by one.
I remember, as a kid, my mother buying pre-baked fan rolls to fix when she was short on time and had to get dinner on the table. There were twelve of them placed side-by-side on a waxed cardboard sleeve that was slid inside of a plastic bag.
My twin sister and I would separate the layers and butter each one. They were the second best thing to Pillsbury canned biscuits with layers. At least we thought so back then, when we’d enjoy those canned biscuits on school mornings. Of course, nothing compared to my mother’s homemade rolls or biscuits on the weekends.
When I make my usual Angel Rolls on holidays, my grandchildren always go back for seconds, but they’ve never been treated to ones with layers. I can’t wait to fix these for Easter dinner next week just to watch their smiling faces as they pull apart and savor the layers.
The only thing hard about making these butter fan rolls is waiting for the dough to rise, if you consider that hard. It’s not hard mixing the dough, it’s just hard waiting.
HOW TO MAKE BUTTER FAN ROLLS
OPTIONAL: Preheat an oven to 160 and turn off. Crack the door while you prepare the dough. You don’t have to do this. You can place the bowl in a warm place in your kitchen, but I love this method of placing the dough in a warm oven to rise.
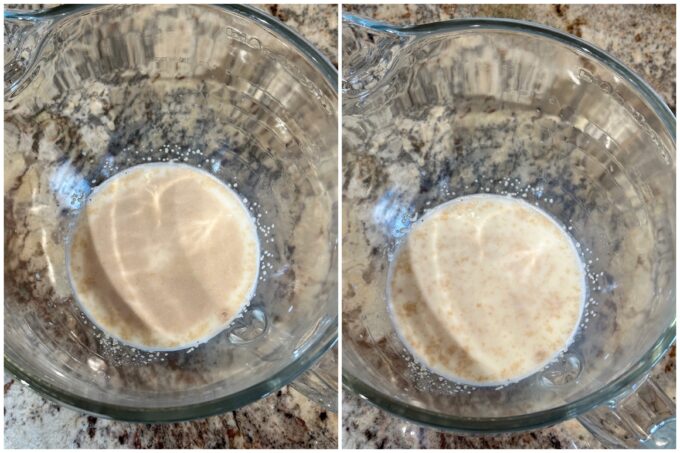
1. Add the warm milk, sugar, and yeast to the bowl of a stand mixer fitted with the paddle attachment. Allow the mixture to sit for 5 minutes until it becomes foamy.

2. Add the egg and egg yolk and mix to combine. Add the salt and flour and mix on medium speed for about 2 minutes until well combined. Switch to the dough hook. Start kneading on medium speed, while pinching off about a tablespoon at a time of the butter and dropping it in. Stop and scrape down the sides of the bowl if necessary. Knead until the dough forms a soft sticky-ball that that pulls away from the sides of the bowl, about 5 minutes.
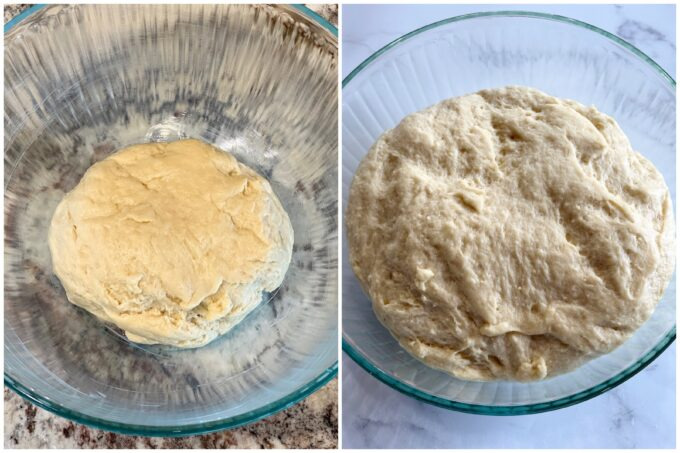
3. Transfer the dough ball into a well buttered bowl. Cover with plastic wrap or a towel and place the bowl in the warm oven. You can shut the oven door as long as the oven is just warm.
4. Leave the bowl in the warm oven until the dough has doubled in size, about 1 1/2 hours.
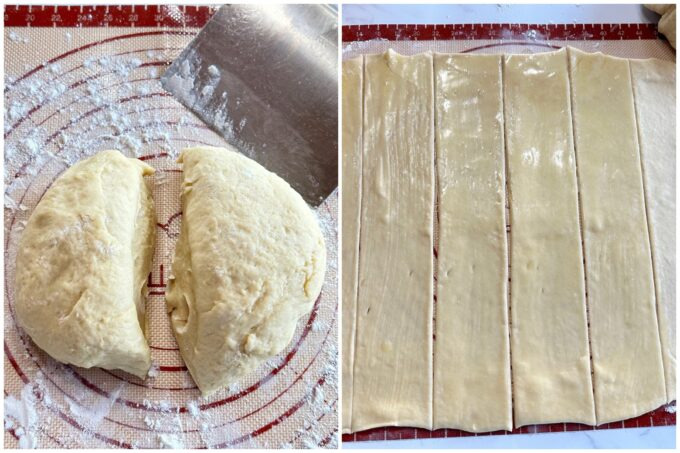
5. Punch down and deflate the dough. Divide the dough into two halves. Place them, one at a time on a floured surface.
6. Roll each half into a rectangle, about 14 x 16 inches each, (14-inches vertically and 16-inches horizontally). For each rectangle, using a pizza cutter, cut the dough vertically into 6 equal strips, (14-inches long). Using a pastry brush, liberally brush the tops of 5 of the strips with melted butter, leaving the 6th strip unbuttered.
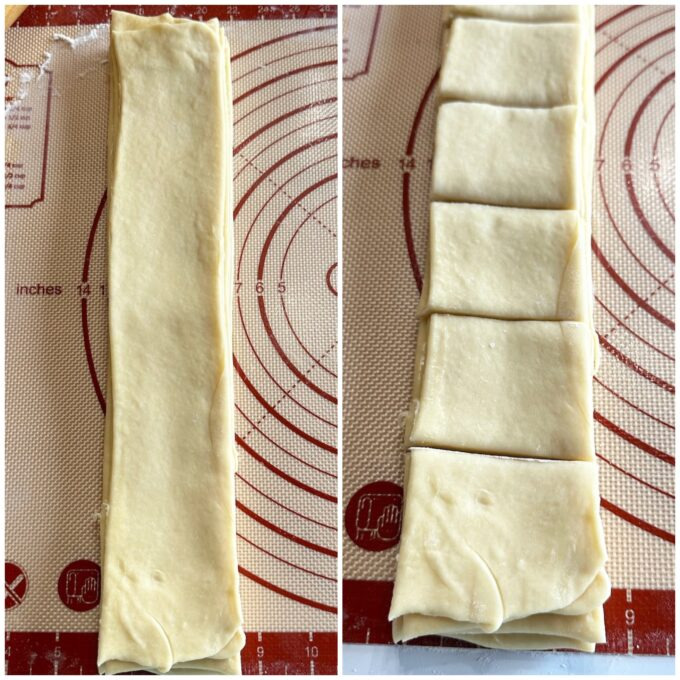
7. Stack the buttered strips on top of each other, placing the unbuttered strip on top.
8. Cut the stacked layers into 6 equal squares. You should have a total of 12 from both rectangles.
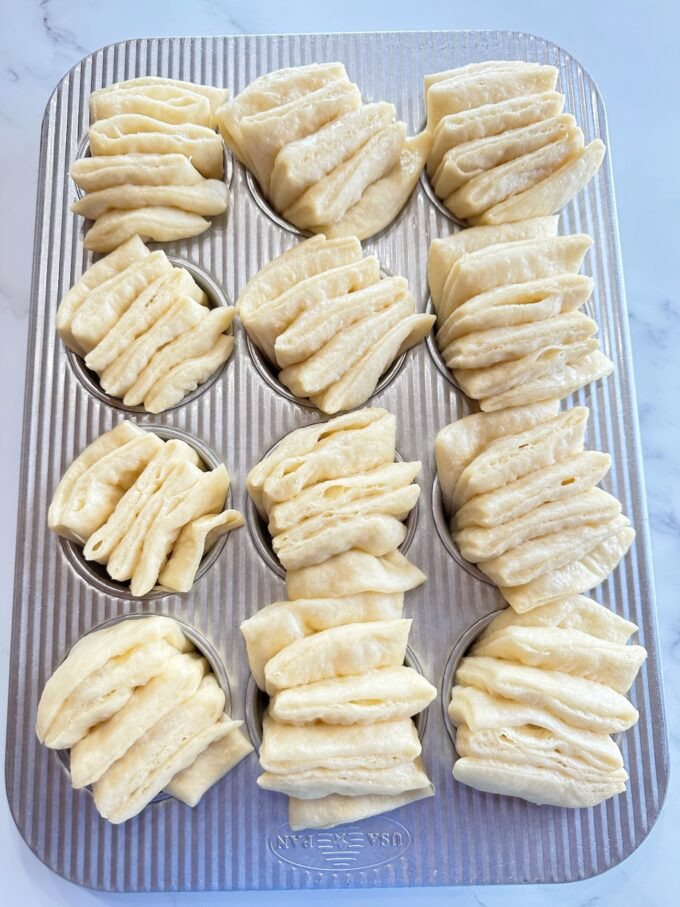
9. Generously grease a standard size muffin tin. Place the squares, cut side up, into the prepared muffin tin. Lightly spray one side of a large piece of plastic wrap and place it over the muffin tin. Place the tin back in the oven and close the door. Allow the dough to rise for 1 hour until very puffy, then bake as directed in recipe.

PRO TIPS FOR MAKING THIS RECIPE
- Make sure the warm milk is the correct temperature, 110 to 115 degrees. If it’s too hot, it will kill the yeast. If it’s not warm enough, it won’t activate the yeast.
- Check the expiration date on your yeast. If it’s expired, don’t chance it, pitch it. Yeast is one thing I don’t use past the expiration date. Old yeast won’t do its job and the dough won’t rise.
- Brush the rolls with melted butter as soon as they come out of the oven.
Frequently asked questions
Can I prepare this recipe ahead of time?
Yes, you can prep the recipe up to the point of placing the dough in the muffin tin to rise for the second time.. Cover the tin with plastic wrap and place in the refrigerator for up to 2 days. When ready to bake, remove the tin from the refrigerator. Place in a warm place and allow the dough to rise for 1 hour or until the dough has risen one inch above the pan. Bake as directed in recipe.
Can I freeze the dough?
Yes, you can make the recipe through the first rise. Shape the dough and place the dough strips in the muffin tin. Wrap the tin securely with plastic wrap then heavy foil. Freeze for up to 3 months. When ready to bake, thaw overnight in the refrigerator. Allow the dough to rise in a warm place for 1 hour or until it has risen about 1 inch above the pan. Bake as directed in recipe.
If you make this recipe, don’t forget to rate it and leave a comment below on how it turned out. I love getting your feedback! 🙂
Follow me on Facebook, Instagram , and Pinterest to see different recipes each day!
Print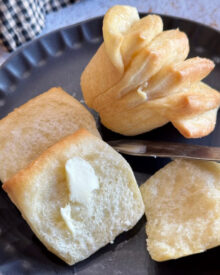
Butter Fan Rolls
- Prep Time: 1 hour 30 minutes
- Cook Time: 18-20 minutes
- Total Time: 0 hours
- Yield: 12 rolls 1x
- Category: Breads
- Method: Bake
- Cuisine: American
Description
You’ll love pulling apart the layers of these tender buttery rolls and savory each and every layer.
Ingredients
- 3/4 cup whole or 2% milk, 110 to 115 degrees
- 3 tablespoons granulated sugar
- 1 packet active dry yeast, .25 ounces (approximately 2 1/4 teaspoons)
- 1 large egg + 1 large egg yolk, room temperature
- 1 teaspoon salt
- 3 1/2 cups all-purpose flour, spooned and leveled
- 1/2 cup (1 stick) unsalted butter, room temperature
- 2 tablespoons salted butter melted
- Melted salted butter for brushing tops
Instructions
- Preheat an oven to 160 degrees and turn off, leaving the door slightly ajar.
- To the bowl of a stand mixer fitted with the paddle attachment, add the warm milk, sugar, and yeast. Allow the mixture to sit for 5 minutes until it becomes foamy. Add the egg and egg yolk and mix to combine. Add the salt and flour and mix on medium speed for about 2 minutes until well combined. Switch to the dough hook. Start kneading on medium speed, while pinching off about a tablespoon at a time of the butter and dropping it in. Stop and scrape down the sides of the bowl if necessary. Knead until the dough forms a soft sticky-ball that that pulls away from the sides of the bowl, about 5 minutes.
- Transfer the dough ball into a well buttered bowl. Cover with plastic wrap or a towel and place the bowl in the warm oven. You can shut the oven door as long as the oven is just warm. Leave the bowl in the warm oven until the dough has doubled in size, about 1 1/2 hours.
- Generously grease a standard size muffin tin. Set aside.
- Punch down and deflate the dough. Divide the dough into two halves. Place them, one at a time on a floured surface. Roll each half into a rectangle, about 14 x 16 inches each, (14-inches vertically and 16-inches horizontally).
- For each rectangle, using a pizza cutter, cut the dough vertically into 6 equal strips, (14-inches long). Using a pastry brush, liberally brush the tops of 5 of the strips with melted butter, leaving the 6th strip unbuttered. Stack the buttered strips on top of each other, placing the unbuttered strip on top. Cut the stacked layers into 6 equal squares. You should have a total of 12 from both rectangles.
- Place the squares, cut side up, into the prepared muffin tins. Lightly spray one side of a large piece of plastic wrap and place it over the muffin tin. Place the tin back in the oven and close the door. Allow the dough to rise for 1 hour until very puffy, (see picture above).
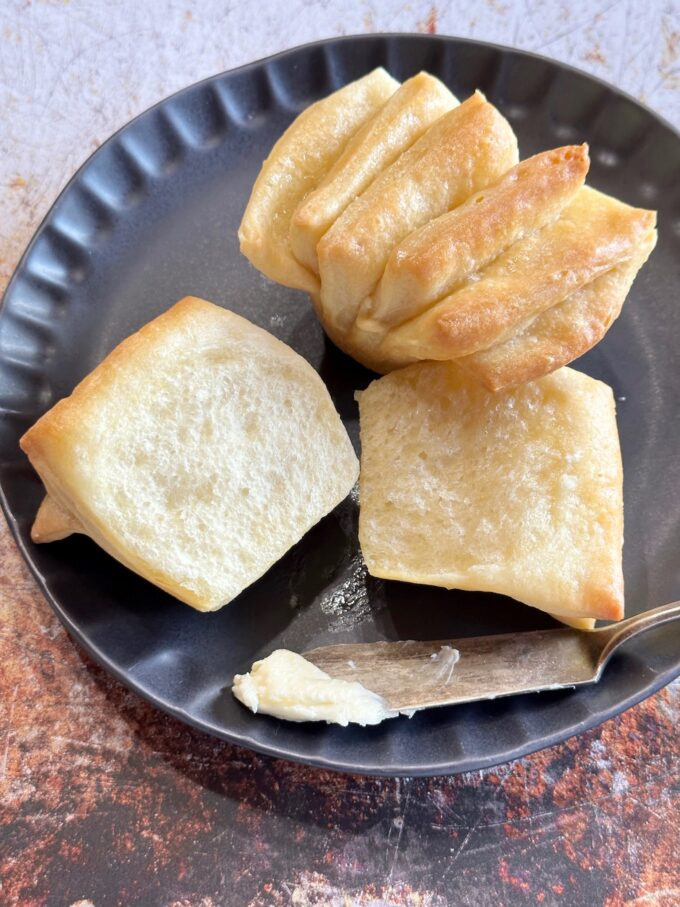
- Remove the muffin tin from the oven. Preheat oven to 350 degrees. Remove plastic wrap from the muffin tin. Bake the rolls for 18 to 20 minutes or until they are golden brown on top. Remove them from the oven and brush the tops with the remaining melted butter.
- Remove from the pan and serve warm.
Hi Emily, It could be expired yeast, too much flour or both. I’m sorry they didn’t turn out for you.