Cherry Hand Pies
These Cherry Hand Pies feature a perfectly sweetened sour cherry pie filling baked inside of the flakiest pie crust. They are the perfect size to share and can be made in any shape. Sneak some of these in a lunchbox and bring on the smiles!
If you love Tart Cherry Pie you’ll love this mini hand-held version. These have the same perfectly sweetened tart cherry pie filling hiding inside of a flaky pie crust and you can cut them out as rounds if you don’t want hearts.
Making the cherry pie filling
This cherry pie filling starts with a bag of frozen red tart cherries. They are every bit as delicious as freshly picked cherries. However, if you’re lucky enough to have fresh cherries when you make these, by all means use them.
Here’s all you do…
- Thaw a bag of frozen cherries.
- Drain any access juice from the thawed cherries, reserving 1/3 cup for the filling.
- Add the cherries, reserved juice, sugar and cornstarch to a medium saucepan over medium heat. Stir constantly until the mixture comes to a boil and begins to thicken, about 5 minutes, and remove from the heat.
- Refrigerate until chilled.

Making & cutting out the pie dough shapes
You need to use a double-crust pie crust recipe here. Here’s the one I used. Mix the dough as directed in your recipe and divide it in half, forming into two pie disc. Refrigerate for 30 minutes.
When ready to roll out…
- Remove one disc at a time from the refrigerator.
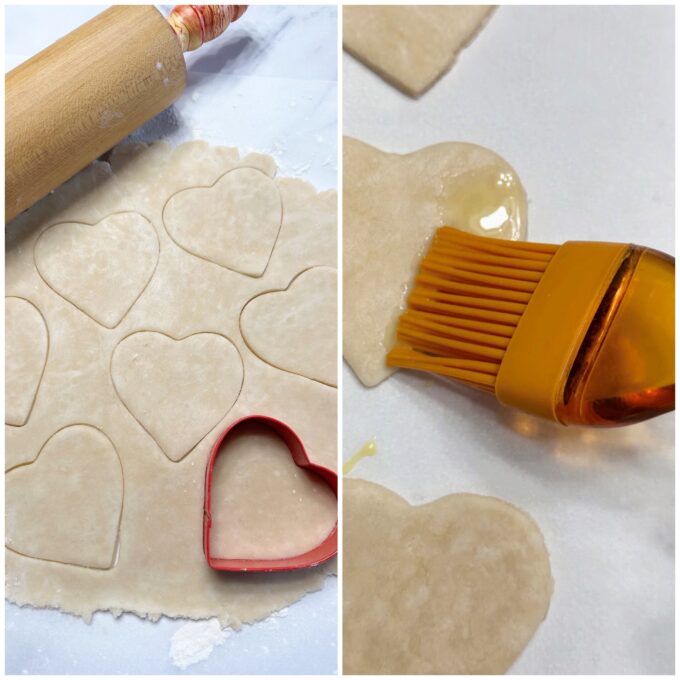
- On a lightly floured surface, roll the dough out into a rough circle about 1/8-inch thick.
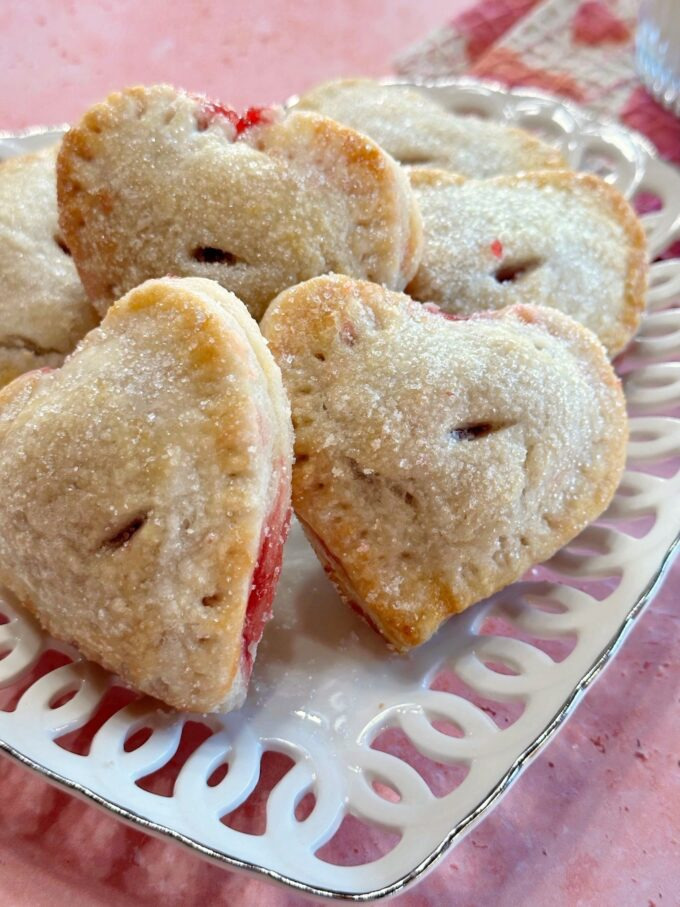
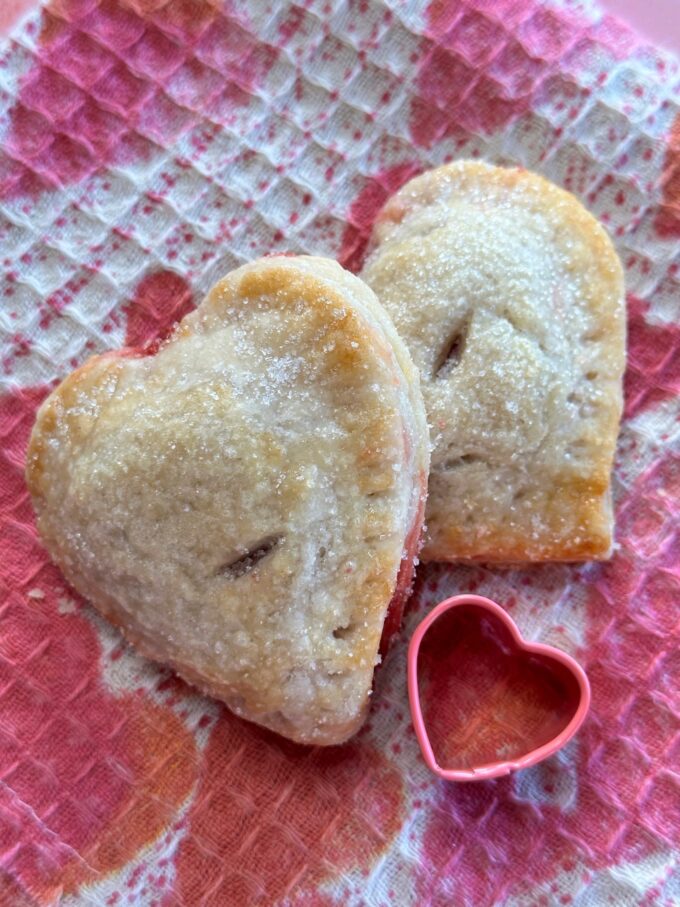
- Using a 4-inch heart cookie cutter, cut out 12 heart shaped pieces of dough, gathering up the scraps and re-rolling them as needed. Place the dough hearts on a cookie sheet, leaving plenty of space between them. Note: Feel free to use a 4-inch round biscuit cutter if you don’t want hearts.
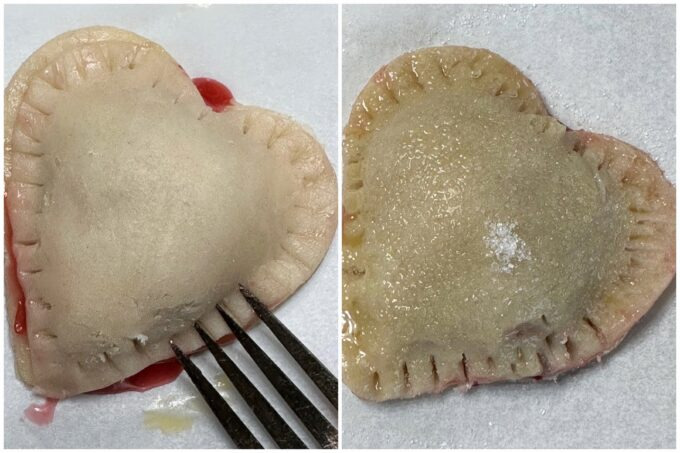
- Brush the edges with a simple egg wash (on recipe) or brush the entire heart. The egg wash on the edges helps the top and bottom hearts to adhere to one another when putting them together.
- Brush the tops with egg wash. This ensures a golden crust and keeps the sugar crystals from falling off.
Can I use fresh instead of frozen cherries?
Feel free to use fresh cherries if you’re lucky enough to have them. There won’t be a need to drain them. Simply replace them for the frozen.
Can I use sweet cherries for this recipe?
Yes, but decrease the sugar to 1/4 to 1/3 cup. Add the 1/4 cup and taste before adding more.
Filling and sealing the cherry hand pies
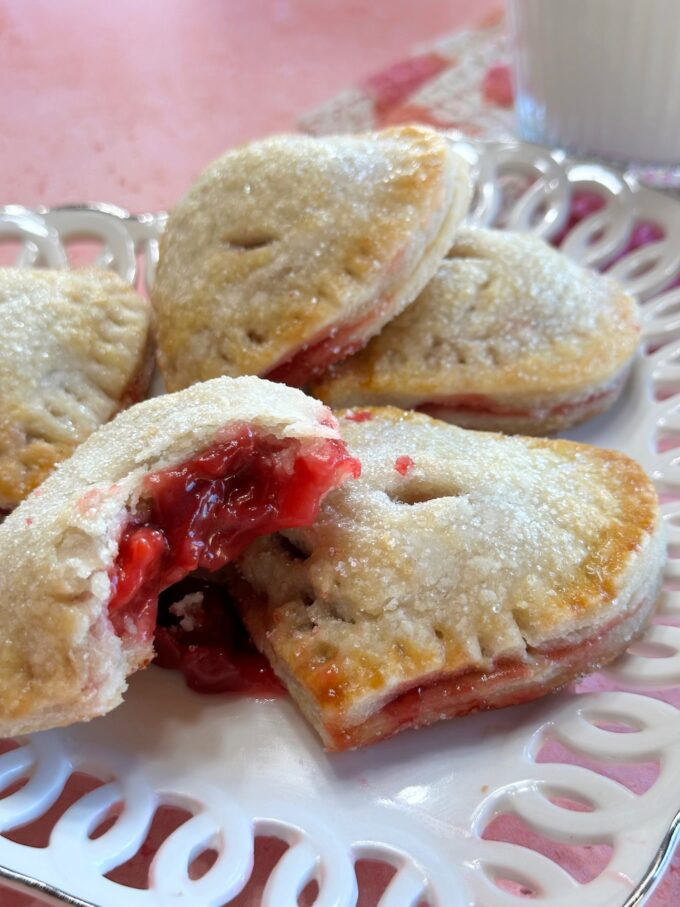
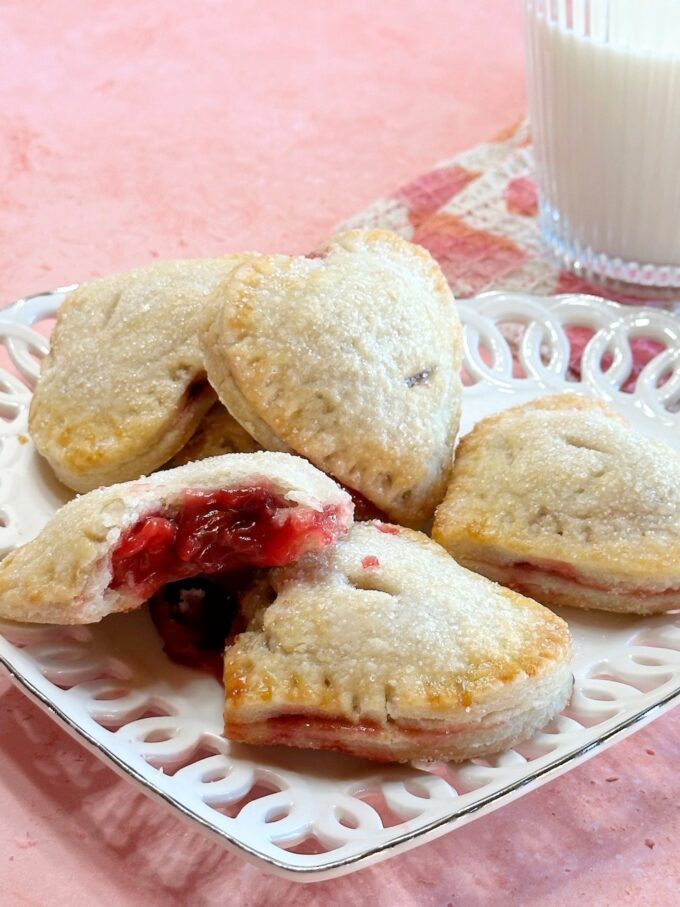
- Spoon 1 tablespoon of the cherry filling on top of each of the 12 bottom hearts. Try to drain off most of the juice by lightly pressing the spoonful of cherries against the side of the pan.
- Roll, cut out and arrange the 12 remaining hearts on top of the cherries. Using your fingertips, press the edges of the top and bottom hearts together. Then take a fork and lightly fork the edges. Don’t worry if you see some juice escape.
- Brush some of the egg wash on the tops and sprinkle with coarse or sparkling sugar.
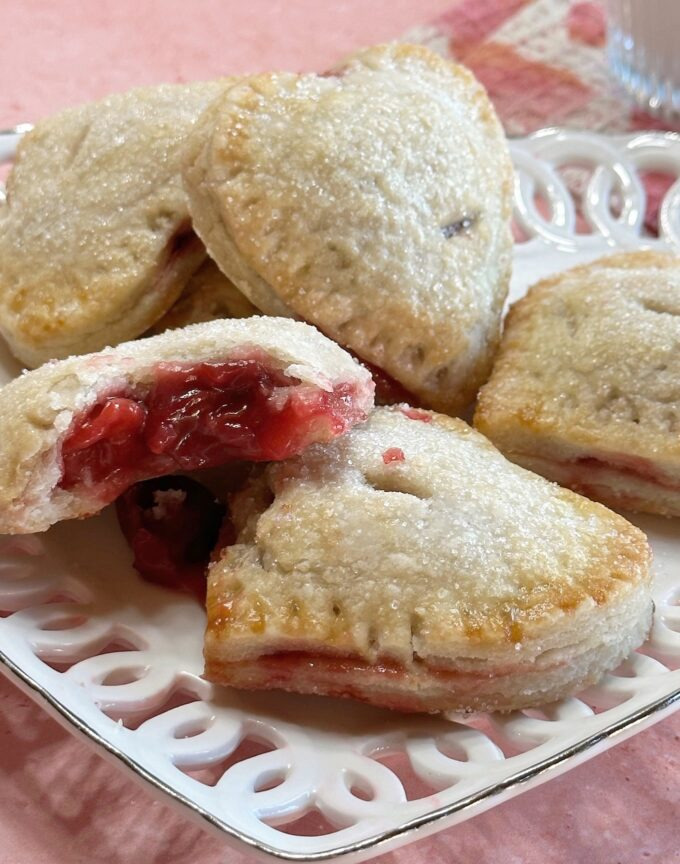
- Bake for approximately 18 to 20 minutes or until lightly browned on top.
- Serve warm with some ice cream on the side or at room temperature.
Can unbaked cherry hand pies be frozen?
Certainly! These pies freeze beautifully and you can bake them straight from the freezer. Allow an extra 10 to 15 minutes of baking time. Wrap tightly and freeze for up to 3 months.
Can baked cherry hand pies be frozen?
They sure can! Wrap securely and freeze for up to 3 months. When ready to eat, thaw them overnight in a refrigerator. Then warm them in an oven.
Tips for making cherry hand pies
- Don’t feel the need to make all the steps the same day. You can make the cherry filling up to 3 to 4 days in advance. You can also make the pie dough the day before.
- Once you make the pie dough, make sure to refrigerate it for at least 30 minutes, if you don’t make it the day before.
- Make sure the filling is totally chilled before placing it on the pie dough cut outs.
- Only remove one disc of pie dough from the refrigerator at a time to work with. It needs to stay chilled as much as possible.
- I don’t recommend rolling the dough any thicker than 1/8-inch. Remember, you have a top and bottom crust.
- Don’t use less than a 4-inch cutter for these hand pies. You want have room for more than a bite of filling if you do. I used 1 tablespoon of filling per hand pie here. If you want more filling, I recommend using a 5-inch cutter. You can fit a little more filling in them. If you use a round cookie/biscuit cutter, you’ll have more room for filling than using a heart shaped cutter.
- Make sure to use the egg wash. When brushed on the edges, it helps the top and bottom to adhere better, and once you pinch the top and bottom together, make sure to fork the edges.
Check out these other delicious cherry desserts…
If you made this recipe, don’t forget to rate it and leave a comment below! I love to hear from you!
Wanna see different recipes each day? Feel free to follow me on Facebook, Pinterest and Instagram.
Print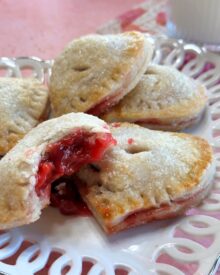
Cherry Hand Pies
- Prep Time: 25 minutes
- Cook Time: 20 minutes
- Total Time: 45 minutes
- Yield: 12 hand pies 1x
- Category: Pies/Valentine's Day
- Method: Bake
- Cuisine: American
Description
These Cherry Hand Pies are the perfect dessert if you want each person to have their own. They are small, but packed full of sweet-tart cherry filling, and have the perfect crispy flaky pie crust.
Ingredients
FOR THE PIE CRUST
- 1 double crust pie crust recipe (here’s the recipe I used)
FOR THE FILLING
- 1 12–ounce bag frozen tart cherries, thawed
- 1/2 cup granulated sugar
- 2 tablespoons cornstarch
- 1 teaspoon pure vanilla extract
- 1 tablespoon butter
FOR THE EGG WASH
- 1 egg
- 1 tablespoon water
- Coarse sugar for sprinkling on the tops
Instructions
FOR THE PIE CRUST
- Make the pie dough and form it into 2 round discs. Refrigerate the discs while you make the filling.
FOR THE FILLING
- Drain any access juice from the thawed cherries, reserving 1/3 cup for the filling. Add the cherries, reserved juice, sugar and cornstarch to a medium saucepan over medium heat. Stir constantly until the mixture comes to a boil and begins to thicken, about 5 minutes, and remove from the heat. Set aside.
- Preheat an oven to 400 degrees.
- Remove one disc at a time from the refrigerator. On a lightly floured surface, roll the dough out into a rough circle about 1/8-inch thick. Using a 4-inch heart cookie cutter, cut out 12 heart shaped pieces of dough, gathering up the scraps and re-rolling them as needed. Place the dough hearts on a cookie sheet, leaving plenty of space between them.
- Make the egg wash by whisking together the egg and water. Brush the edges or the entire heart with the egg wash. This will help the edges of the top piece of dough to adhere to the bottom edges.
- Stop and repeat step #3 with the remaining disc of dough, except cut them and leave aside while you add the filling to the bottom hearts.
- Spoon 1 tablespoon of the cherry filling on top of each of the 12 bottom hearts. Try to drain off most of the juice by lightly pressing the spoonful of cherries against the side of the pan.
- Arrange the 12 remaining hearts on top of the cherries. Using your fingertips, press the edges of the top and bottom hearts together. Then take a fork and lightly fork the edges. Don’t worry if you see some juice escape.
- Brush some of the egg wash on the tops and sprinkle with coarse or sparkling sugar.
- Bake for approximately 18 to 20 minutes or until lightly browned on top.
- Serve warm with some ice cream on the side or at room temperature.
Notes
- You can freeze unbaked hand pies for up to 3 months. Wrap securely before freezing. Bake straight from freezer to oven, allowing 10 to 15 extra minutes for baking.
- You can freeze baked pies for ups to 3 months. Wrap securely. Thaw overnight in a refrigerator. Warm in an oven.
- If using fresh cherries, there’s no need to drain. Simply replace them for the frozen.