How To Braid A Pie Crust
Learn how to make an impressive-looking braided pie crust and be prepared to impress your holiday guests. Follow the steps and photos below and you’ll see how easy it is. You need to save this tutorial to your holiday baking repertoire!

The holidays are right around the corner. Are you on top of your pie crust-making game? Fancy-looking piecrusts are much easier to make than you might think. This braided pie crust takes just a few extra minutes to prep but it’s not hard, and you’ll end up with an impressive-looking finished pie.
Choosing a pie crust recipe!
Before we talk about making a braided pie crust, you need to decide what pie crust recipe you want to use. You can use your favorite pie crust recipe, or feel free to use my favorite Crisco pie crust.
There are a couple of things you need to keep in mind when choosing a pie crust recipe to use. You need plenty of pie dough. The pie recipe itself might be a regular or deep-dish recipe, but regardless, for the braided pie crust, I suggest using a recipe for a deep-dish pie crust. I’ve included both shallow and deep-dish measurements on the Crisco pie crust above. It’s a good thing to have plenty of pie dough when braiding it. A little too much is better than not enough!
Making the pie crust!
Now you’re ready to make your pie crust. Here’s what you need to do!
- Make a recipe for a double crust deep-dish pie.
- Divide the dough in half as should be indicated on your recipe and form each half into a disc.
- Wrap each one in plastic wrap and refrigerate for at least 30 minutes.
- Remove one pie disc from the refrigerator and roll out and place in a pie dish. Trim the edge of the pie dough about 1/2 longer than the edge of the pie dish. Turn the edges under and lightly press the dough down with your fingers along the edge or you can actually crimp the edges lightly with a fork. You will be placing the braided dough over this later, so it doesn’t have to look perfect. Place the pie dish in the refrigerator while you work on making the braid.
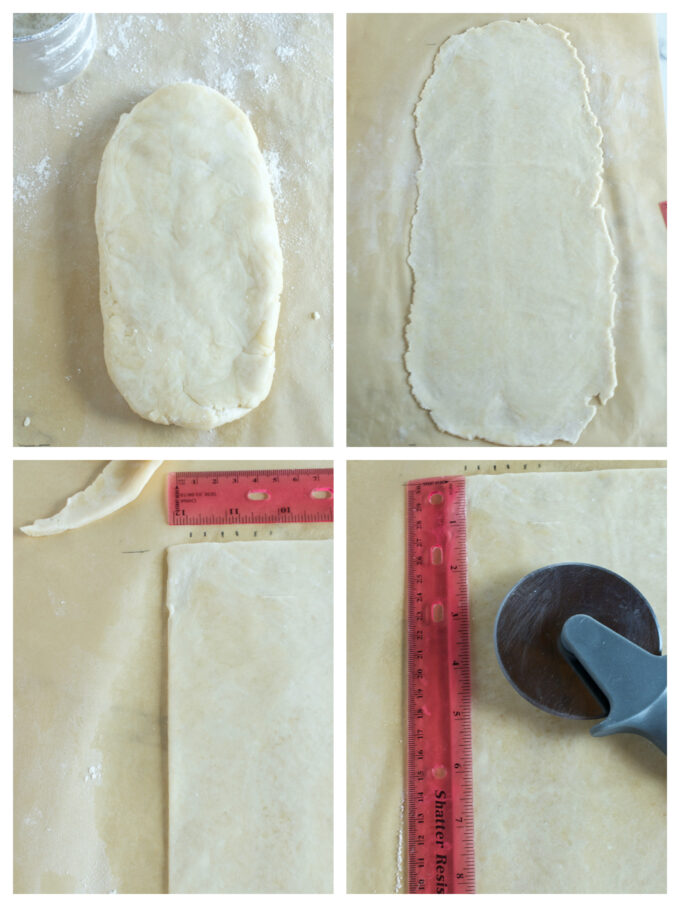
Rolling the dough for the braids!
- Remove the second disc of dough from the refrigerator. Roll the dough out on a well floured work surface or piece of parchment paper. Roll it into a rough rectangle of about 16 inches long x 6 inches wide. It doesn’t need to be perfect.
- Using a ruler and sharp knife or pizza cutter cut off the edges of the dough, giving it a straight edge.
- Using a ruler, mark off 1/4 inch increments along the top of the dough.
- Now use the ruler and a pizza cutter or knife and cut long strips of dough. You will need to make 2 long braids of dough, therefore, you need 6 strips of dough, 1/4-inch wide, but cut all of the dough into strips. This way you’ll have extras in case some of them break. If the dough becomes too warm, the strips will break.
- Place the dough strips on a parchment-lined cookie sheet and place them in the freezer for about 5 minutes before braiding.
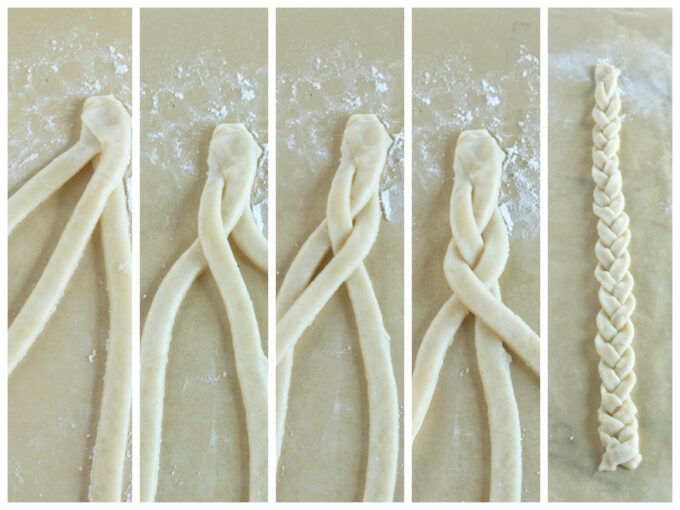
Making the braids!
- Take 3 strips and press the tops together. Note: At any time during the braiding process, if the dough starts to break or fall apart, place it back in the freezer or freeze until it feels cold to the touch.
- Pick up the outer strip on the right side and cross it over the center strip.
- Now pick up the outer strip on the left side and cross it over the center strip.
- Repeat step 2. Pick up the outer strip on the right side and cross it over the center strip.
- Repeat step 3. Pick up the outer strip on the left side and cross it over the center strip.
- Keep repeating right to left until you’ve braided the entire length of the strips of dough.
- Very lightly press the 3 ends together. Don’t overdo it! You will be joining this strip to the next strip.
- Repeat steps 1 through 7 two more times.
Placing the braided dough on the pie shell!
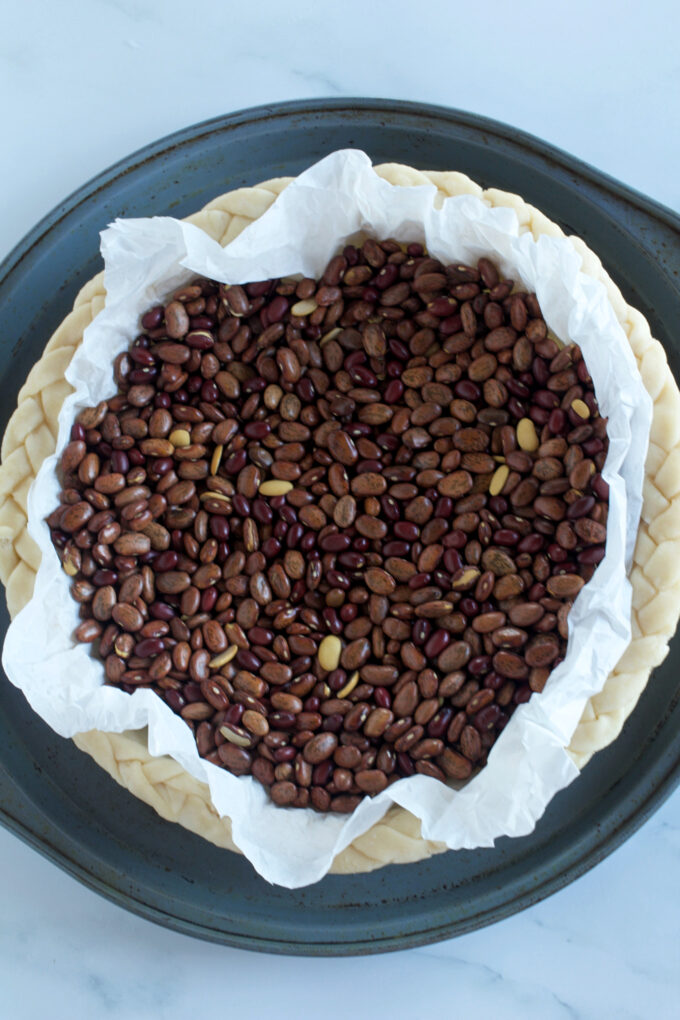
- Remove the empty pie shell from the refrigerator.
- Using a pastry brush, brush water around the top edge of the pie shell.
- Take the first braid and place it on top of the wet pie shell edge.
- Repeat step 2 & 3 with the second braid. To join the two, gently uncross the very end of each braid and weave the two ends into each other.
Extra tips:
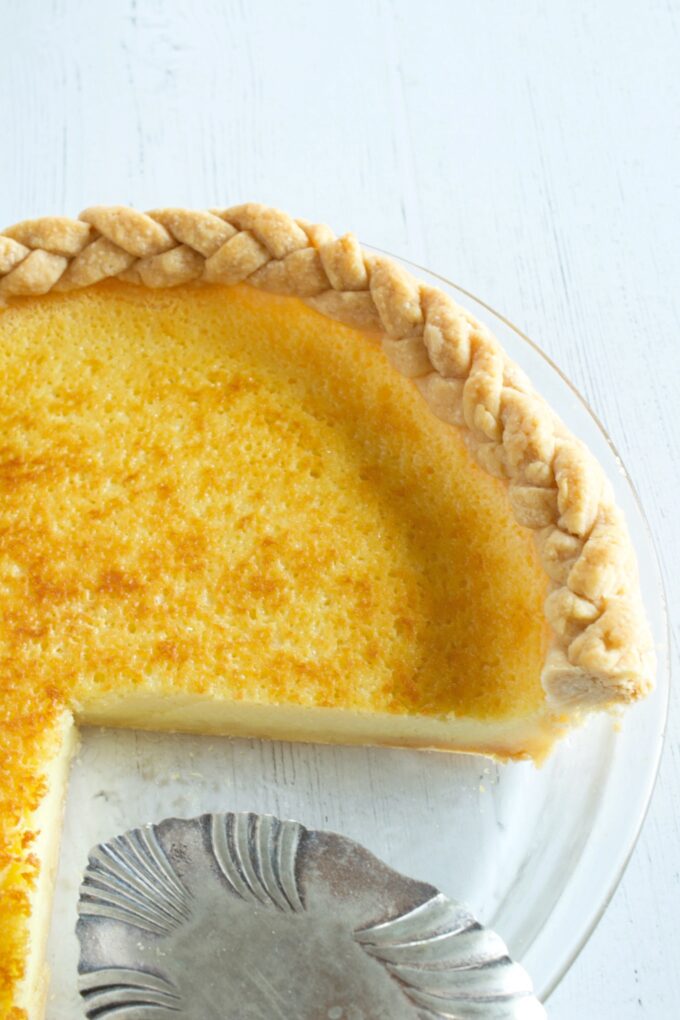
Do you plan to pre-bake your empty pie shell or do you plan to fill it and bake it? Regardless of what you decide to do, you might consider brushing an egg wash over the edges of the pie shell. Here are some different pie crust washes. You can choose a glossy shine, a light sheen…you have a few options.
Prebaking:
If you decide to pre-bake your pie shell and fill it later, here’s all you need to do,
- Place the prepared pie shell in the freezer for about 30 minutes.
- Preheat the oven to 375 degrees.
- Dock the pie shell. This simply means using a fork and pricking the bottom of the pie shell so that it doesn’t puff up while baking.
- Crumple up a piece of parchment paper, then un-crumple it. Place it in the bottom of the pie shell.
- Add pie weights… either beans, rice, or store-bought ceramic weights. Make sure to spread them to the edges.
- Bake the pie for about 20 minutes or until the edges are turning a light brown and remove it from the oven. Remove the pie weights and parchment paper.
- Bake for an additional 10 to 13 minutes or until the bottom and sides of the crust are golden brown. Note: If the edges start to brown too much before the bottom is browned, cover them with foil.
- Cool the crust completely before filling.
You might also like…
Uhg.. Crisco. I bake with butter only. Do you have a pie recipe using butter?
Thx.
T.
Hi Teri, Please check out this recipe for the butter pie crust, Fried Apple Pie.