Pineapple Coconut Cake
This Pineapple Coconut Cake is moist and delicious and made with a tropical combination of juicy pineapple, and coconut. If that’s not enough, it’s finished with a delectable cream cheese frosting and toasted coconut.

This Pineapple Coconut Cake is moist and delicious, but the flavor gets even better on the second day. It also has four thin layers that aren’t really defined until the second day. It’s delicious no matter when you eat it!
This cake might look like a two layer cake, but don’t be fooled. It’s actually four thin layers, but it’s so moist that the four layers meld together. The layers actually look more defined the following day, and the cake actually tastes better the following day.
This recipe is actually a Southern Living recipe, and after reading all the reviews, I just had to make it. Boy, am I glad I did. It is absolutely moist and delicious. Serve this cake for any occasion, and I promise it won’t disappoint.
The thing I like best about this recipe is the fact that you can make the pineapple filling and the frosting ahead of time.
Pineapple Filling (Make ahead of time and refrigerate)
I suggest making the pineapple filling the day before you make the cake. It will save you time the following day. Here’s how easy it is to make the filling.
- Combine all the ingredients in a medium saucepan over medium heat.
- Stir constantly until the mixture thickens, about 10 minutes. Transfer the mixture to a bowl and refrigerate until chilled before spreading on cake layers.

How to make the frosting (feel free to make ahead)
I listed the frosting 2nd, because it’s a rather thin frosting. It thickens and spreads easier once you refrigerate it for a bit.
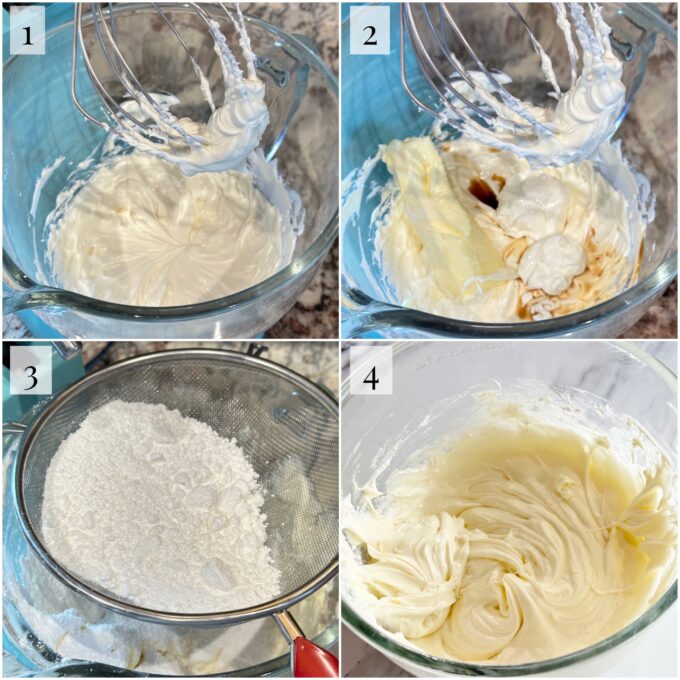
- Add the cream cheese to the bowl of a stand mixer. Mix on high speed until it’s creamy and free of any lumps. Stop and scrap down the sides and under the paddle attachment, to make sure you get all of the lumps. Don’t add the butter or other ingredients until all of the lumps are removed.
- Add the butter, sour cream, and vanilla extract, and mix until all ingredients are throughly combined.
- Sift in the powdered sugar, one cup at a time, mixing well after each addition.
- Keep mixing until the frosting is very smooth and spreadable.

Mixing the cake batter
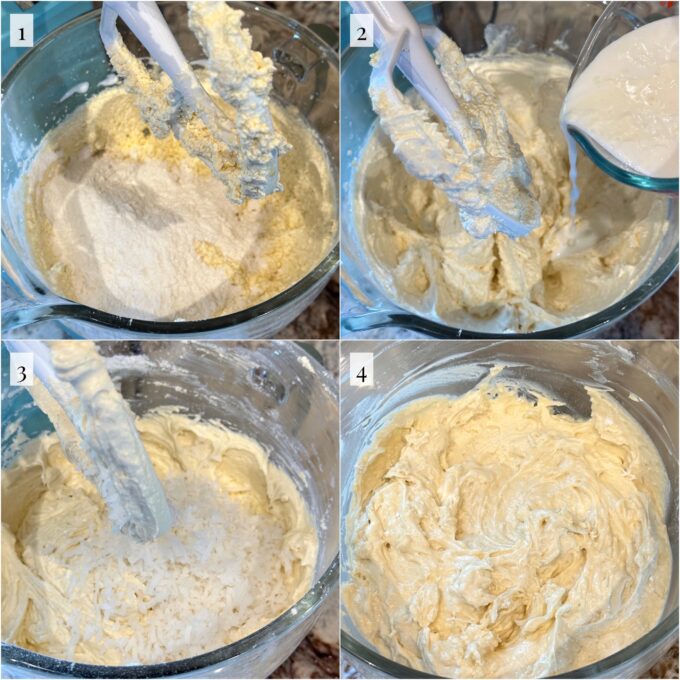
- Add the butter and sugars to the bowl of a stand mixer fitted with the paddle attachment (or use a hand mixer). Mix on high speed until the mixture is very light and creamy, about 3 minutes. Add the eggs, one at a time, mixing well after each addition. Add the vanilla & coconut extracts. Mix on high for about 3 more minutes until the mixture light and fluffy. Add half the dry ingredients, and mix on low speed just until mostly combined.
- Add the buttermilk-whipping cream mixture and mix until incorporated.
- Add the remaining dry ingredients and the coconut.
- Mix just until the dry ingredients are incorporated. Don’t over mix.


Assembling the cake
- Invert the cooled cakes onto a piece of waxed or parchment paper.
- Using a sharp serrated knife, or a cake leveler, cut each layer into two thin layers, creating 4 thin layers.

- Place one thin cake layer, cut side up, on a cake plate. Spread half of the pineapple filling over the layer.
- Place a second layer, cut side down, over the pineapple filling. Spread 1 slightly rounded cup of frosting over the layer.
- Place 3rd cake layer on, cut side up, and spread the second half of the pineapple filling over the layer.
- Place the 4th cake layer cut side down, on the top. Frost the top and sides with the remaining frosting.

Can I use unsweetened coconut in this cake?
Yes, you sure can. This cake has plenty of sugar to make it sweet. The sweetness from the coconut won’t be missed.
Can I make this cake in advance?
Certainly. I highly recommend making it at least one day in advance. This gives the flavors more time to meld together.
Can I freeze this cake?
Yes. You can freeze the entire frosted cake. Make sure to wrap it securely. I wrap plastic wrap around and over the cake, then I place in in my secure cake container and freeze. You can freeze for up to 3 months. Thaw overnight in the refrigerator. Remove it from the refrigerator about 30 minutes before serving.
Can I use all buttermilk in this recipe?
Yes. However the whipping cream adds some extra butter fat and richness. It will still be delicious and moist if you use all buttermilk.

This delicious recipe was adapted from Southern Living, with minor changes.
If you like this recipe, you might also like…
If you make this recipe please rate it, and leave a comment below on how you liked it. I love getting your feedback!
Wanna see different recipes each day? Feel free to follow me on Facebook, Pinterest, & Instagram!
Print
Pineapple Coconut Cake
- Cook Time: 35 minutes
- Total Time: 35 minutes
- Yield: 12 servings 1x
- Category: Cakes/Desserts
- Method: Bake
- Cuisine: American
Description
This Pineapple Coconut Cake is moist and delicious and made with a tropical combination of juicy pineapple, and coconut. If that’s not enough, it’s finished with a delectable cream cheese frosting and toasted coconut. It’s delicious!
Ingredients
PINEAPPLE FILLING (make first and refrigerate)
- 1 (20-ounce) can crushed pineapple IN JUICE, (not drained)
- 1/2 cup granulated sugar
- 2 tablespoons plus 1 teaspoon cornstarch
CAKE
- 2 1/4 cups all-purpose flour
- 1 1/2 teaspoons baking powder
- 1/2 teaspoon baking soda
- 1/2 teaspoon salt
- 2/3 cup full-fat buttermilk
- 1/3 cup heavy whipping cream
- 1 cup unsalted butter, room temperature
- 1/3 cup light brown sugar, lightly packed
- 3/4 cup granulated sugar
- 3 large eggs, room temperature
- 2 teaspoons pure vanilla extract
- 1 teaspoon pure coconut extract
- 2/3 cup shredded sweet coconut
FROSTING (You can make this in advance too if you want)
- 8 ounces cream cheese, room temperature
- 4 tablespoons unsalted butter, room temperature
- 1/4 cup sour cream
- 1 teaspoon pure vanilla extract
- 2 cups powdered sugar, sifted
Instructions
PINEAPPLE FILLING
- Combine all the ingredients in a medium saucepan over medium heat. Stir constantly until the mixture thickens, about 10 minutes. Transfer the mixture to a bowl and refrigerate until chilled before spreading on cake layers.
CAKE
- Preheat oven to 350 degrees. Place a round of waxed paper in the bottom of two 9-inch round cake pans. Grease the paper and insides of pans. Lightly flour the pans and paper, tapping out any excess flour. Set aside.
- In a medium bowl, sift or whisk together the flour, baking powder, baking soda, and salt. Set aside.
- Combine the buttermilk and whipping cream in a 1 cup measuring cup. Set aside.
- Add the butter and sugars to the bowl of a stand mixer fitted with the paddle attachment (or use a hand mixer). Mix on high speed until the mixture is very light and creamy, about 3 minutes. Add the eggs, one at a time, mixing well after each addition. Add the vanilla & coconut extracts. Mix on high for about 3 more minutes until the mixture light and fluffy.
- Add half the dry ingredients, and mix on medium-low speed just until combined. Add the buttermilk-whipping cream mixture and mix until incorporated. Add the remaining dry ingredients and the coconut. Mix just until the dry ingredients are incorporated. Don’t over mix.
- Divide the batter equally between the two cake pans, using an offset spatula to level off the top of the batter.
- Bake the cakes until lightly browned on top, and a toothpick test comes out clean, about 25 minutes. Rotate the pans halfway through baking. Allow the cakes to cool in the pans. Invert them onto a piece of waxed or parchment paper. Using a sharp serrated knife to cut each layer into 2 thin layers, creating 4 thin layers.
FROSTING
- Add the cream cheese to the bowl of a stand mixer. Mix on high speed until it’s creamy and free of any lumps. Stop and scrap down the sides and under the paddle attachment, to make sure you get all of the lumps. Don’t add the butter until all of the lumps are removed.
- Add the butter, sour cream, and extracts, and mix until creamy and smooth.
- Sift in the sugar, one cup at a time, mixing well after each addition. Once you’ve added enough sugar for a perfect piping or spreading consistency, stop adding. You might not add all of the sugar.
TO FROST
- Place one thin cake layer, cut side up, on a cake plate. Spread half of the pineapple filling over the layer.
- Place a second layer, cut side down, over the pineapple filling.
- Spread 1 slightly rounded cup of frosting over the layer.
- Place 3rd cake layer on, cut side up, and spread the second half of the pineapple filling over the layer.
- Place the 4th cake layer cut side down, on the top.
- Frost the top and sides with the remaining frosting.
TO STORE
- Refrigerate cake until an hour or so before serving, due to the cream cheese and sour cream in the frosting.
- The flavor is best when the cake is at room temperature. The cake has even more flavor the day after it’s made, once the pineapple filling has time to soak into the cake layers.
Notes
- Once all layers are assembled, the cake will look like a 2 layer versus 4 layer cake. That’s because the pineapple filling will soak into the cake layers, making it super moist.
- Cook time includes cooking the pineapple filling and baking the cakes.

This brings back memories from my childhood. I remember my Grandmother making this cake for Christmas. I couldn’t wait to eat a piece. Now I will attempt to make this. Wish me luck. Thanks for sharing this recipe!
Hi Latosha, You’re so welcome! I hope it turns out great for you! 🙂
I live in India. Here we get fresh coconut, tender coconut and desiccated coconut ( powder sort of), so which one will be the best to use in your recipe. I love your recipes and I’ve tried few of them. Please answer so that I can try this one too. Thank you
Hi Shilpi, Feel free to use the fresh coconut. It will probably be even better than the store bought. I don’t recommend using the desiccated in this recipe. It won’t be as moist. Happy baking! 🙂