Salted Caramel Chocolate Cake
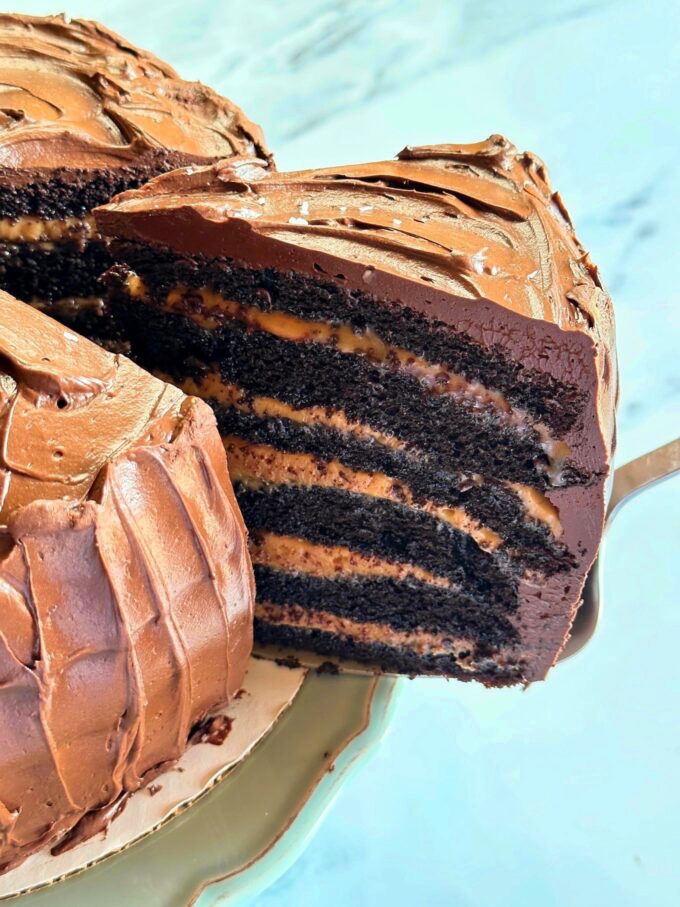
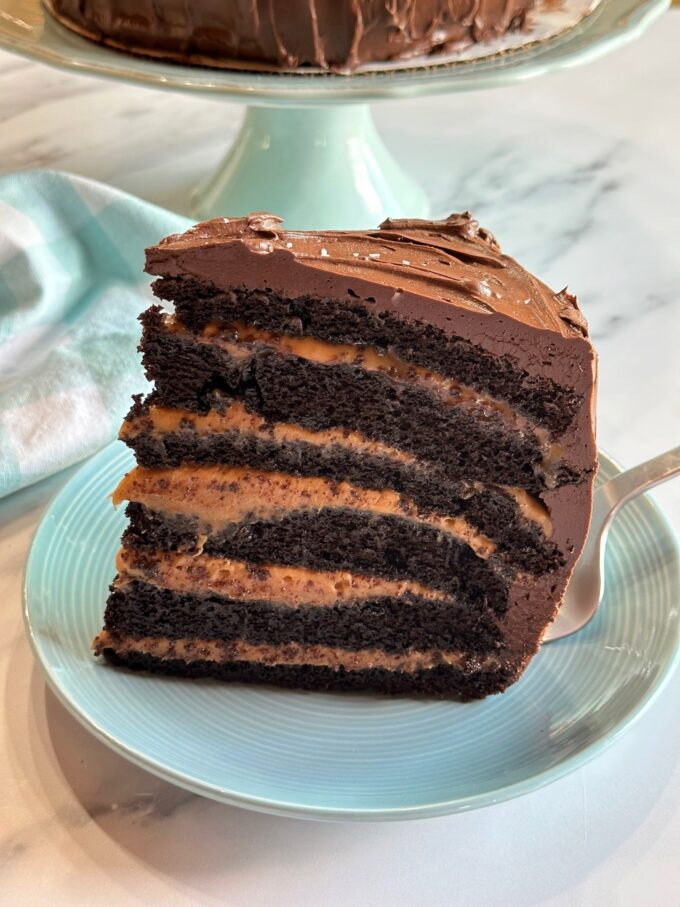
This Salted Caramel Chocolate Cake features six super moist layers of dark chocolate cake with homemade caramel tucked between each layer, and it’s topped with a not-too-sweet chocolate frosting. What could possibly be wrong with this combination? Nothing!!
This decadent Salted Caramel Chocolate Cake does require some time but it’s so worth it and it can be made ahead of time in steps. Made with two kinds of chocolate and homemade caramel, it is absolutely divine!!
If you love chocolate cake, this one will become your all-time favorite. Don’t let this show stopper cake intimidate you. The cake, caramel, and frosting, (none of which are hard), can all be made in advance and assembled the day you serve it.
Tips To Prevent Sugar Crystallization
I feel it’s important to talk about sugar crystallization, in case you’re a novice at making any type of candy or caramel. This step of the recipe might be the most intimidating to some, therefore, I’ll go into some detail about making the caramel. You’ll see, it’s really not hard. You just need a little patience.
When you make caramel, you’re mixing water, and sugar together and sometimes honey or light syrup. Once this sugary mixture begins to boil, the wet sugar crystals that splatter up onto the sides of the pan will form a crusty crystallized sugar ring around the pan. This is not a good thing, because pieces or small clumps of this crusty crystallized mixture can fall into your caramel, and that’s not a good thing. However, there are ways to prevent sugar crystallization.
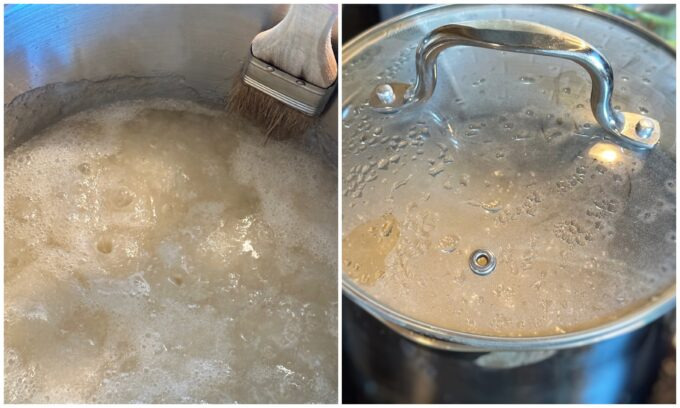
- Dip a pastry brush in water and brush down the insides of the pan frequently, or…
- Once the ingredients are combined, place a lid on the pan until the mixture comes to a boil and keep covered for for 2-3 minutes, then remove the lid. The steam will condense and wash down the insides of the pan, preventing sugar crystals from forming.
More helpful tips…
- Add the sugar and water, and syrup or honey to the pan first, (off the heat). Very gently mix the ingredients together with a wooden spoon until all of the sugar is wet with the water, being careful to not let any wet sugar granules splash upon the sides of the pan.
- If covering the pan with a lid, place the lid on before the mixture begins to boil, and make sure to remove the lid after 2-3 minutes of boiling. Don’t leave the lid on the pan throughout the entire cooking process. Why? The water needs to boil off of the sugar in order for the sugar to concentrate and caramelize. As long as the lid is on the pan the water will not evaporate, meaning the temperature of the sugar will not rise enough to concentrate. Okay, now you’re ready to make the caramel.
How To Make The Caramel
Part 1

- Off heat, add the sugar, water, and corn syrup to a heavy bottomed medium saucepan. Using a wooden spoon, very gently combine the ingredients, making sure to not splatter any wet sugar granules up on the insides of the pan. Choose one of the two options listed above for washing the sugar crystals down from the sides.
- Cook over high heat, without stirring, until the mixture becomes a dark amber color, (see the stages in the above pictures). This could take up 14 minutes. Don’t walk away! The mixture can turn from dark amber to burnt within a few seconds. Remove the pan from the heat.
Part 2
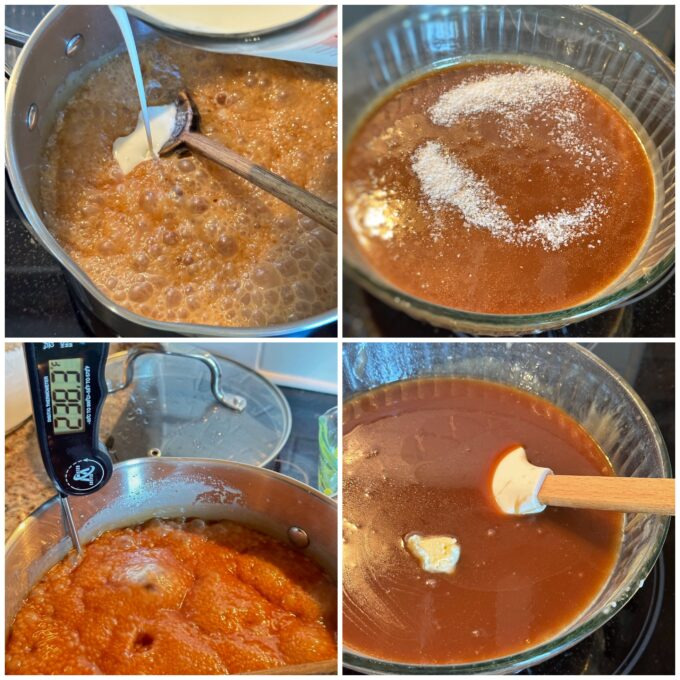
- Carefully add the cream. Be careful…it will splatter! Stir until it’s smooth.
- Clip a candy thermometer on the side of the pan. Return the pan to medium-high heat, and cook until the caramel reaches 238 degrees, (soft-ball stage).
- Remove from heat, and mix in the salt. Allow the caramel to cool for 15 minutes.
- Add the butter a couple of pieces at a time, mixing it into the caramel each time. Allow the caramel to cool completely while you make the cake. You can also make the caramel up to three days in advance. Refrigerate it and bring it to room temperature before using.

Making The Cake
This cake is made with rich Dutch Process cocoa. The cake batter makes three 9-inch moist dark chocolate cake layers. You can bake the cake layers 2 to 3 days in advance. Simply wrap the cooled layers in plastic wrap and refrigerate them.
To Prep The Cake Pans
Butter the insides of three 9-inch round cake pans. Cut and fit a piece of round waxed or parchment paper to place in the bottoms of each pan. Butter the paper. Dust the paper and the insides of the pans generously with cocoa powder, tapping out any excess. Set aside.
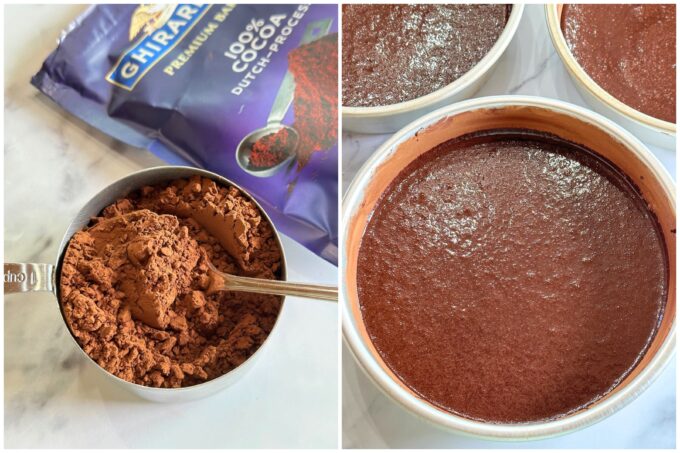
- Over the bowl of a stand mixer, sift the flour, granulated sugar, cocoa, baking soda, baking powder, and salt. Note…if the holes in your wire mesh strainer are really small, the salt will remain in the sifter. Just add it back into the bowl after sifting. Beat on lowest speed until all ingredients are combined. Increase speed to medium and add the eggs, one at a time, making sure each one is incorporated before adding the next one. Add buttermilk, oil, vanilla, and warm water. Beat on medium speed until the mixture is very smooth and free of any lumps, about 1 minute. Don’t over beat it.
- Divide the batter equally between the three pans. You should have roughly 1 1/2 cups or 12 ounces of batter per cake pan. Mine was actually 14 ounces per pan to be exact. Shake them back and form to level out the batter and tap each pan on a counter to pop any air bubbles.
- Bake the cakes until a toothpick inserted in the centers comes out clean, about 35 minutes. Let the cakes cool in the pans for 10 minutes. Run a sharp knife around the edges and invert cakes onto wire racks and cool completely.
Making the Frosting
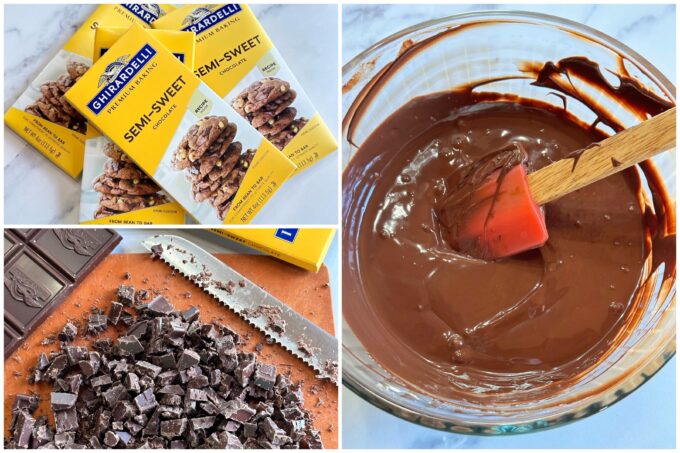
This to-die-for chocolate frosting is outrageously delicious! It’s made with 2 kinds of chocolate, dutch process, and chopped semi-sweet baking bars. Oh, yes…4 bars of chocolate. Now that’s some chocolate!
What I love about this frosting is that it’s not too sweet…just sweet enough. It only has 1/2 cup of powdered sugar, whereas most American buttercream frostings have at least 4 cups, making them cloyingly sweet.
- In a measuring cup, whisk together the cocoa and 1/4 cup plus 2 tablespoons of warm water, making a slurry. Set aside.
- To the bowl of a stand mixer, add the butter, powdered sugar, and salt, and beat on medium speed until light and fluffy. Gradually beat in the melted chocolate followed by the cocoa slurry. Beat until well combined.
- Set the frosting aside for 30 minutes before using.
Recipe adapted from Martha Stewart.
Follow me on Facebook, Pinterest, and Instagram, for different recipes each day!
If you make this recipe, please rate it and leave a comment below on how it turned out. I love hearing from you! 🙂
Print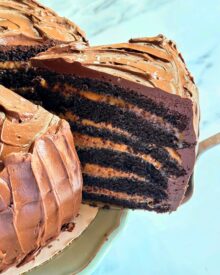
Salted Caramel Chocolate Cake
- Prep Time: 45 minutes
- Cook Time: 35 minutes
- Total Time: 1 hour 20 minutes
- Yield: 12 servings 1x
- Category: cake
- Method: Bake
- Cuisine: American
Ingredients
FOR THE CARAMEL
- 4 cups granulated sugar
- 1/4 cup water
- 1/4 cup light corn syrup
- 2 cups heavy whipping cream
- 1 teaspoon coarse salt
- 2 sticks unsalted butter, cut into small pieces
FOR THE CAKE
- 3 cups all-purpose flour
- 3 cups granulated sugar
- 1 1/2 cups unsweetened Dutch-processed cocoa powder
- 1 tablespoon baking soda
- 1 1/2 teaspoons baking powder
- 1 1/2 teaspoons coarse salt
- 4 large eggs, room temperature
- 1 1/2 cups full-fat buttermilk
- 1/2 cup + 2 tablespoons canola oil
- 2 teaspoons pure vanilla extract
- 1 1/2 cups warm water
FOR THE FROSTING
- 16 ounces semisweet chocolate, chopped, melted, and cooled
- 1/4 cup + 2 tablespoons Dutch-processed cocoa powder
- 1/4 cup + 2 tablespoons water
- 1 cup (2 sticks) unsalted butter, room temperature
- 1/2 cup powdered sugar
- 1/8 teaspoon coarse salt
- Coarse salt for garnish
Instructions
FOR THE CARAMEL
- Add the sugar, water, and corn syrup to a heavy bottomed medium saucepan. Mix to combine. Cook over high heat, without stirring, until the mixture becomes a dark amber color, about 14 minutes. Don’t walk away! Remove from the heat and carefully add the cream. Be careful…it will splatter! Stir until it’s smooth.
- Clip a candy thermometer on the side of the pan. Return the pan to medium-high heat, and cook until the caramel reaches 238 degrees, (soft-ball stage). Remove from heat, and mix in the salt. Allow the caramel to cool for 15 minutes.
- Add the butter a couple of pieces at a time, mixing it into the caramel each time. Allow the caramel to cool completely while you make the cake. You can also make the caramel in advance. Refrigerate it and bring it to room temperature before using.
FOR THE CAKE
- Preheat oven to 350 degrees.
- Butter the insides of three 9-inch round cake pans. Cut and fit a piece of round waxed or parchment paper to place in the bottoms of each pan. Butter the paper. Dust the paper and the insides of the pans generously with cocoa powder, tapping out any excess. Set aside.
- Over the bowl of a stand mixer, sift the flour, granulated sugar, cocoa, baking soda, baking powder, and salt. Note…if the holes in your wire mesh strainer are really small, the salt will remain in the sifter. Just add it back into the bowl after sifting. Beat on lowest speed until all ingredients are combined. Increase speed to medium and add the eggs, one at a time, making sure each one is incorporated before adding the next one. Add buttermilk, oil, vanilla, and warm water. Beat on medium speed until the mixture is very smooth and free of any lumps, about 1 minute. Don’t over beat it.
- Divide the batter equally between the three pans. You should have roughly 1 1/2 cups or 12 ounces of batter per cake pan. Mine was actually 14 ounces per pan to be exact. Shake them back and form to level out the batter and tap each pan on a counter to pop any air bubbles.
- Bake the cakes until a toothpick inserted in the centers comes out clean, about 35 minutes. Let the cakes cool in the pans for 10 minutes. Run a sharp knife around the edges and invert cakes onto wire racks to cool completely.
- Trim the mounded tops of the cake layers to make them level. (Go ahead and sneak and eat that part, when the kids aren’t watching). It’s best to use a serrated knife. Cut each cake layer horizontally to form 2 thinner layers.
FOR THE FROSTING
- In a measuring cup, whisk together the cocoa and 1/4 cup plus 2 tablespoons of warm water, making a slurry. Set aside.
- To the bowl of a stand mixer, add the butter, powdered sugar, and salt, and beat on medium speed until light and fluffy. Gradually beat in the melted chocolate followed by the cocoa slurry. Beat until well combined. Set the frosting aside for 30 minutes before using.
- Assemble the cake: Transfer 1 split cake layer to a cake plate. Spread about 3/4 cup of the caramel over the layer. Repeat with remaining layers, not covering the top one. Refrigerate the cake for 1 hour before frosting.
- Frost the top and sides of the cake. Sprinkle a little bit of coarse salt on top.
- Cover the cake, (I place it in my cake container), and leave it at room temperature for up to 3 days.
Notes
- You can make the caramel up to 3 days in advance. Refrigerate until ready to use. Bring to room temperature before using. This can take up to 2 hours.
- You can also make the cake layers in advance. Wrap them securely in plastic wrap and refrigerate.
- If you prefer, you can simply make it a three layer cake, using more caramel between each cake layer.