Description
It’s best to use Platinum Gelatin Sheets for these bubbles, if you want clear pristine bubbles. The dry powdered gelatin will result in cloudy, dingy looking bubbles, and who wants a dingy snowglobe!! Make sure you make the bubbles 24 hours prior to using them.
Ingredients
Scale
- 12 sheets of Platinum gelatin
- Ice water
- 8 water balloons
- Wooden skewers, tape, and a piece of stryofoam at least 1-inch in thickness and 1 1/2 feet long
- Nonstick cooking spray
Instructions
- Add the gelatin sheets, one at a time, to a large bowl of ice water, making sure you separate them with a fork, so they don’t stick together. Allow them to sit in the ice water for about 10 minutes to soften. Remove the softened gelatin sheets from the bowl and gently squeeze the excess water from the sheets and back into the bowl.
- Add the gelatin sheets and 3 tablespoons of the water from the bowl to a small pan. Place the pan over low heat, and gently swirl the pan occassionally until the gelatin is almost entirely melted. It doesn’t have to be hot, just melted. Remove the pan from the heat and allow the warm gelatin to cool. If the gelatin starts to set up while you’re working with it, simply place it over low heat for a few seconds to liquify it again.
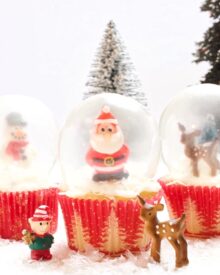
- Blow up 8 water balloons to a size that are proportionate to the size of the cupcakes. Don’t make them too big. You want them to look like a snow globe on top of each cupcake. See the pictures above this recipe. Using tape, attach the balloons to the ends of skewers.
- Spray your hands with the cooking spray. Rub your hands together until most of the oil has absorbed into your hands. Lightly rub your hands over each balloon, transferring just a tiny amount of the oil to each balloon. They shouldn’t be shiny or greasy lookin or the gelatin won’t stick to them. You should be able to do about 4 balloons before spraying your hands again.
- Pour the liguid gelatin into a small bowl that is deep and narrow. Dip a balloon into the gelatin, turning it and making sure the entire balloon is covered with the gelatin, with the exception of the tied knot end. You’ll be cutting this part off later. Hold the balloon over the bowl, allowing all of the excess gelatin to drip off the balloon and back into the bowl. Repeat with each balloon and place them upright in the stryofoam board. This is your first initial gelatin layer.
- Allow the balloons to sit for about 10 minutes until they are no longer tacky when you touch them. Re-warm the gelatin on low heat just to liguify it again. Allow it to cool completely before using. Dip the balloons a second time and place them back on the stryofoam board. Allow the balloons to sit for 24 hours. I cut this time in half by placing them in front of a fan.
- The balloons are ready when they feel hard when you tap them and they are not tacky or soft at all. Remove the balloons from the skewers. Cut a small hole in each balloon next to the stem. The balloon should release itself from the sides of the gelatin bubble, shrivel up and fall down into the bubble. If a balloon doesn’t want to release from the insides of the gelatin bubble, just set it aside for a few minutes, and it will gradually shrink on its own and release itself.
- You can store the gelatin bubbles indefinietely, however they do not like moisture. Therefore, I don’t recommend refrigerating them.
Notes
If you must use powdered gelatin, see Elizabeth’s tips on how to use it here..
Total prep time does not include drying time.